
Manage OpenStack using Terraform and GitLab: Manage OpenStack using Terraform and GitLab ajscanlas Wed, 02/15/2023 – 03:00
One virtue of GitOps is Infrastructure as Code. It encourages collaboration by using a shared configuration and policy repository. Using GitLab can further enhance collaboration in your OpenStack cluster. GitLab CI can serve as your source control and orchestration hub for CI/CD, and it can even manage the state of Terraform.
To achieve this, you need the following:
- GitLab account or instance.
- Private OpenStack cluster. If you don’t have one, read my article Set up OpenStack on a Raspberry Pi cluster.
- A computer (preferably a container host).
GitLab and Terraform state
The goal is to achieve collaboration through Terraform, so you need to have a centralized state file. GitLab has a managed state for Terraform. With this feature, you can enable individuals to manage OpenStack collaboratively.
Create a GitLab group and project
Log in to GitLab, click on the hamburger menu, and click Groups?View all groups.
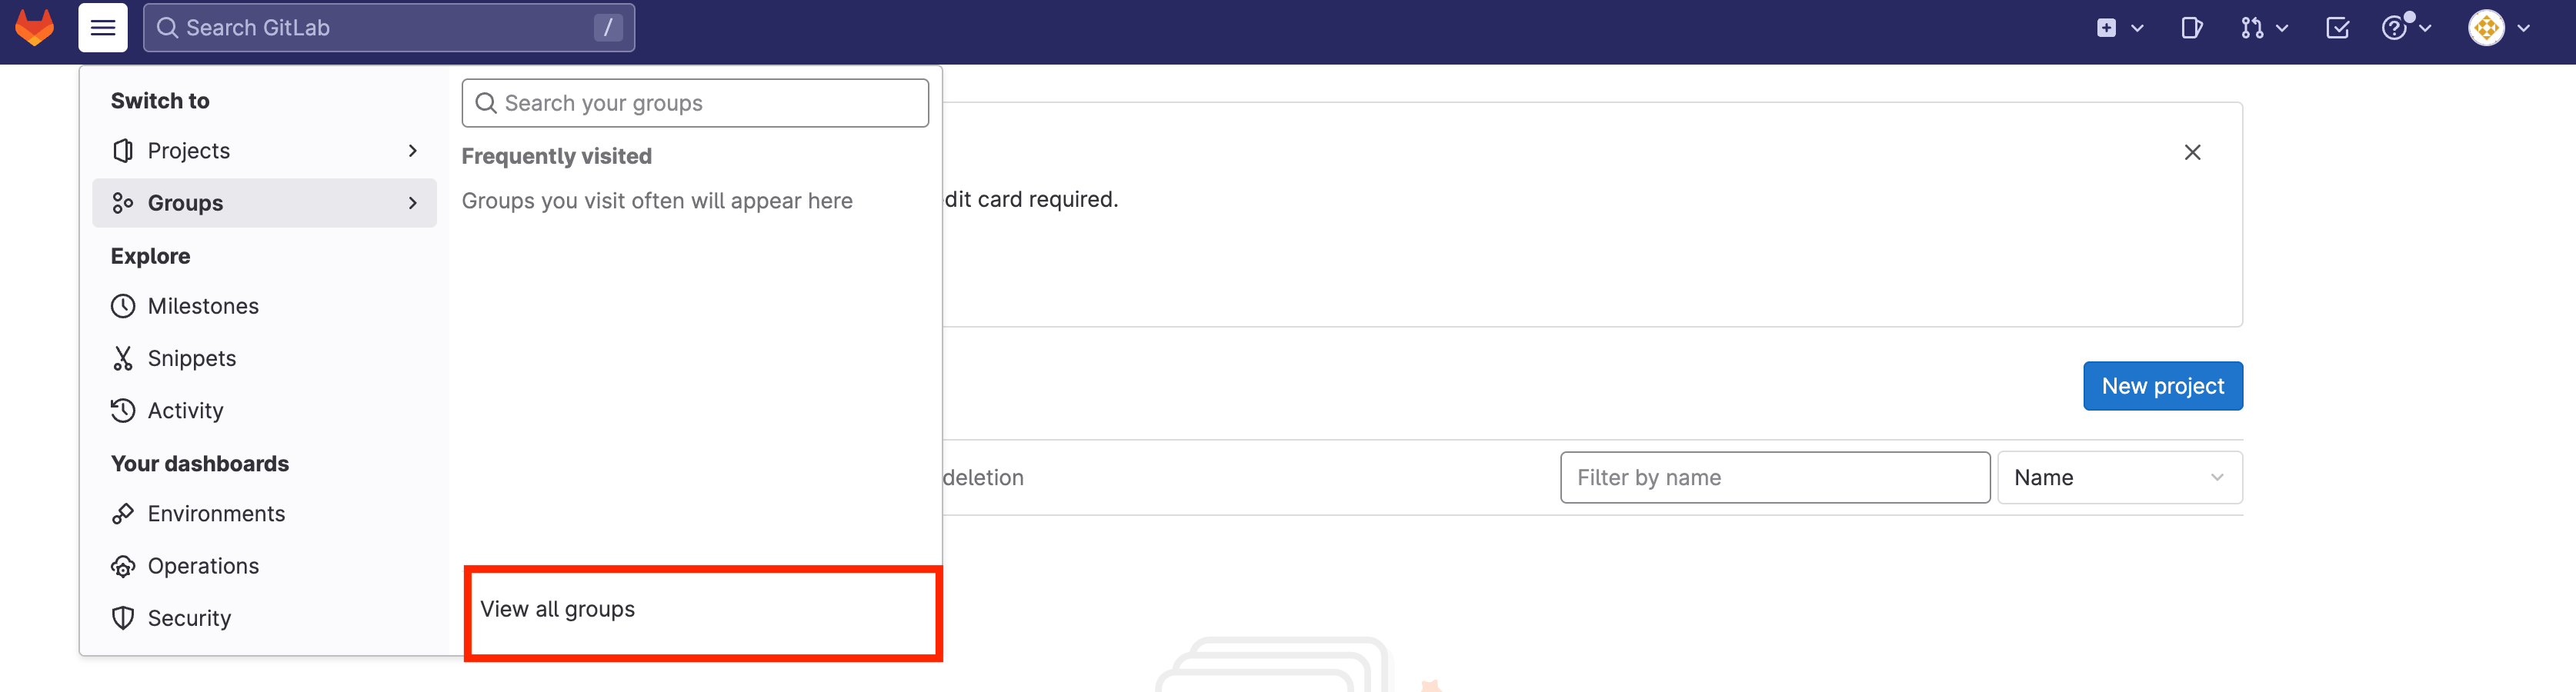
(AJ Canlas, CC BY-SA 4.0)
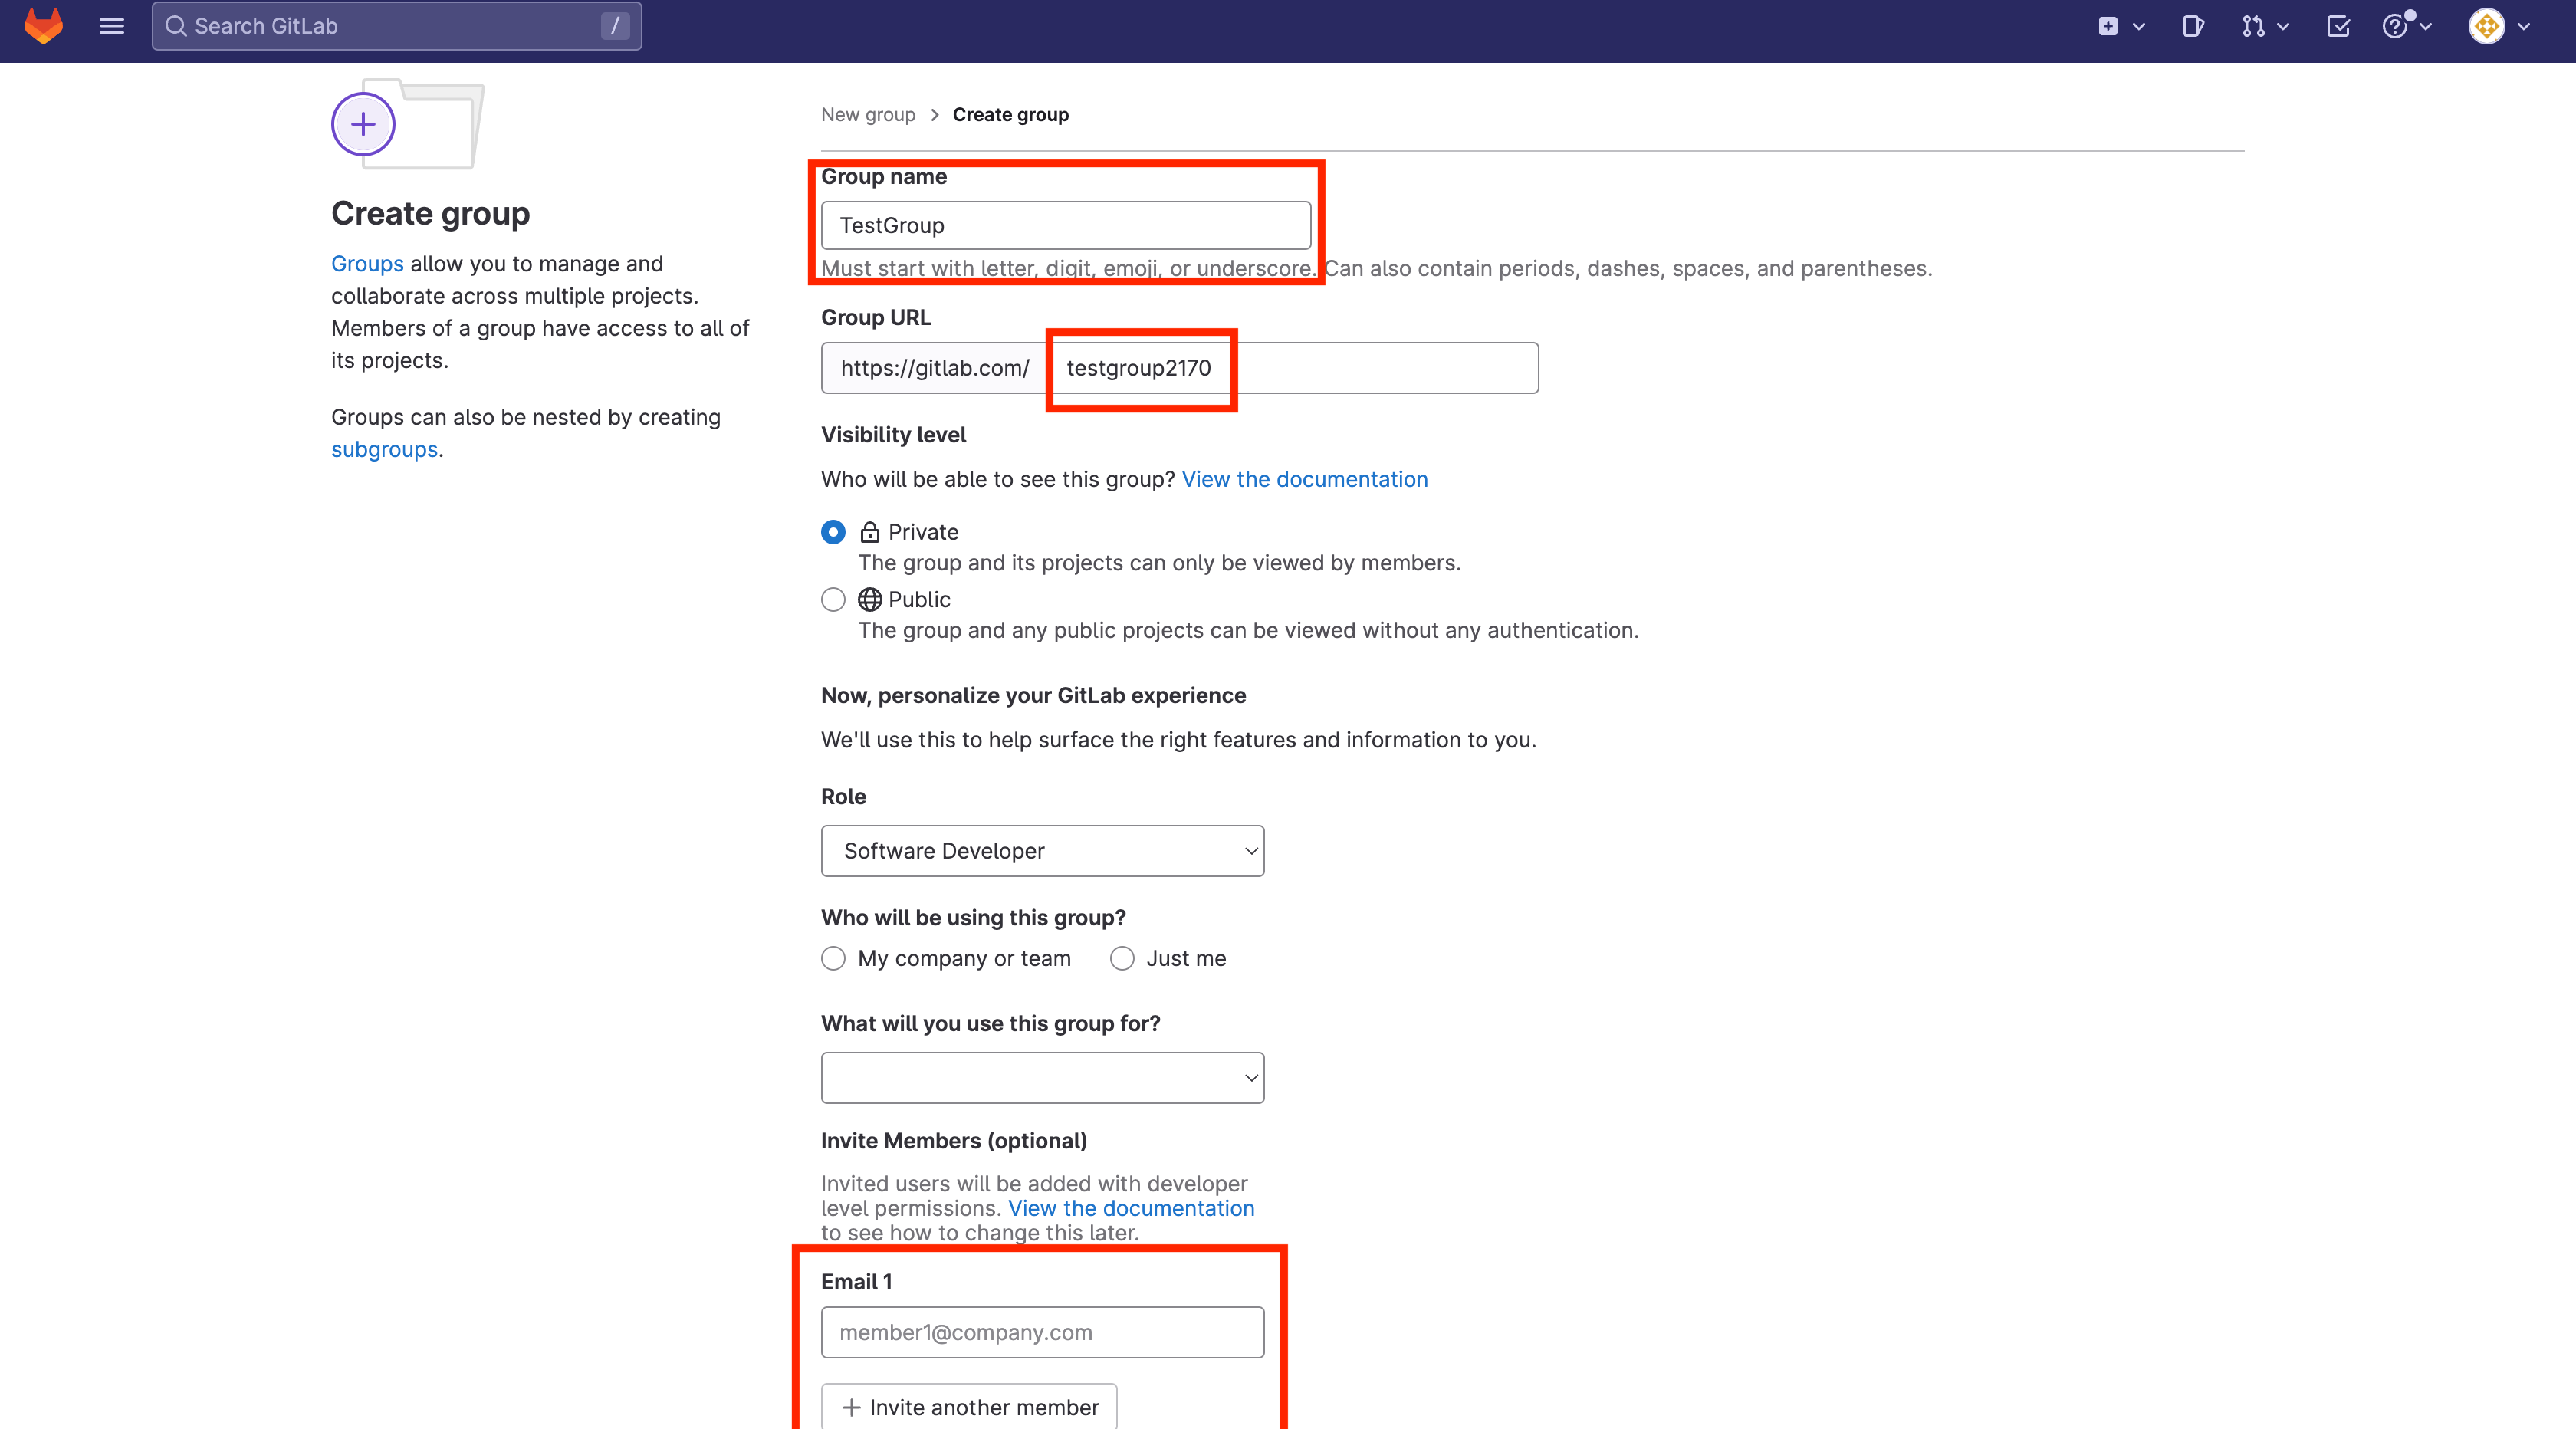
Create a group by clicking on New group and then on Create group.

(AJ Canlas, CC BY-SA 4.0)
Name the group to generate a unique group URL, and invite your team to work with you.
(AJ Canlas, CC BY-SA 4.0)
After creating a group, create a project by clicking Create new project, and then Create blank project:
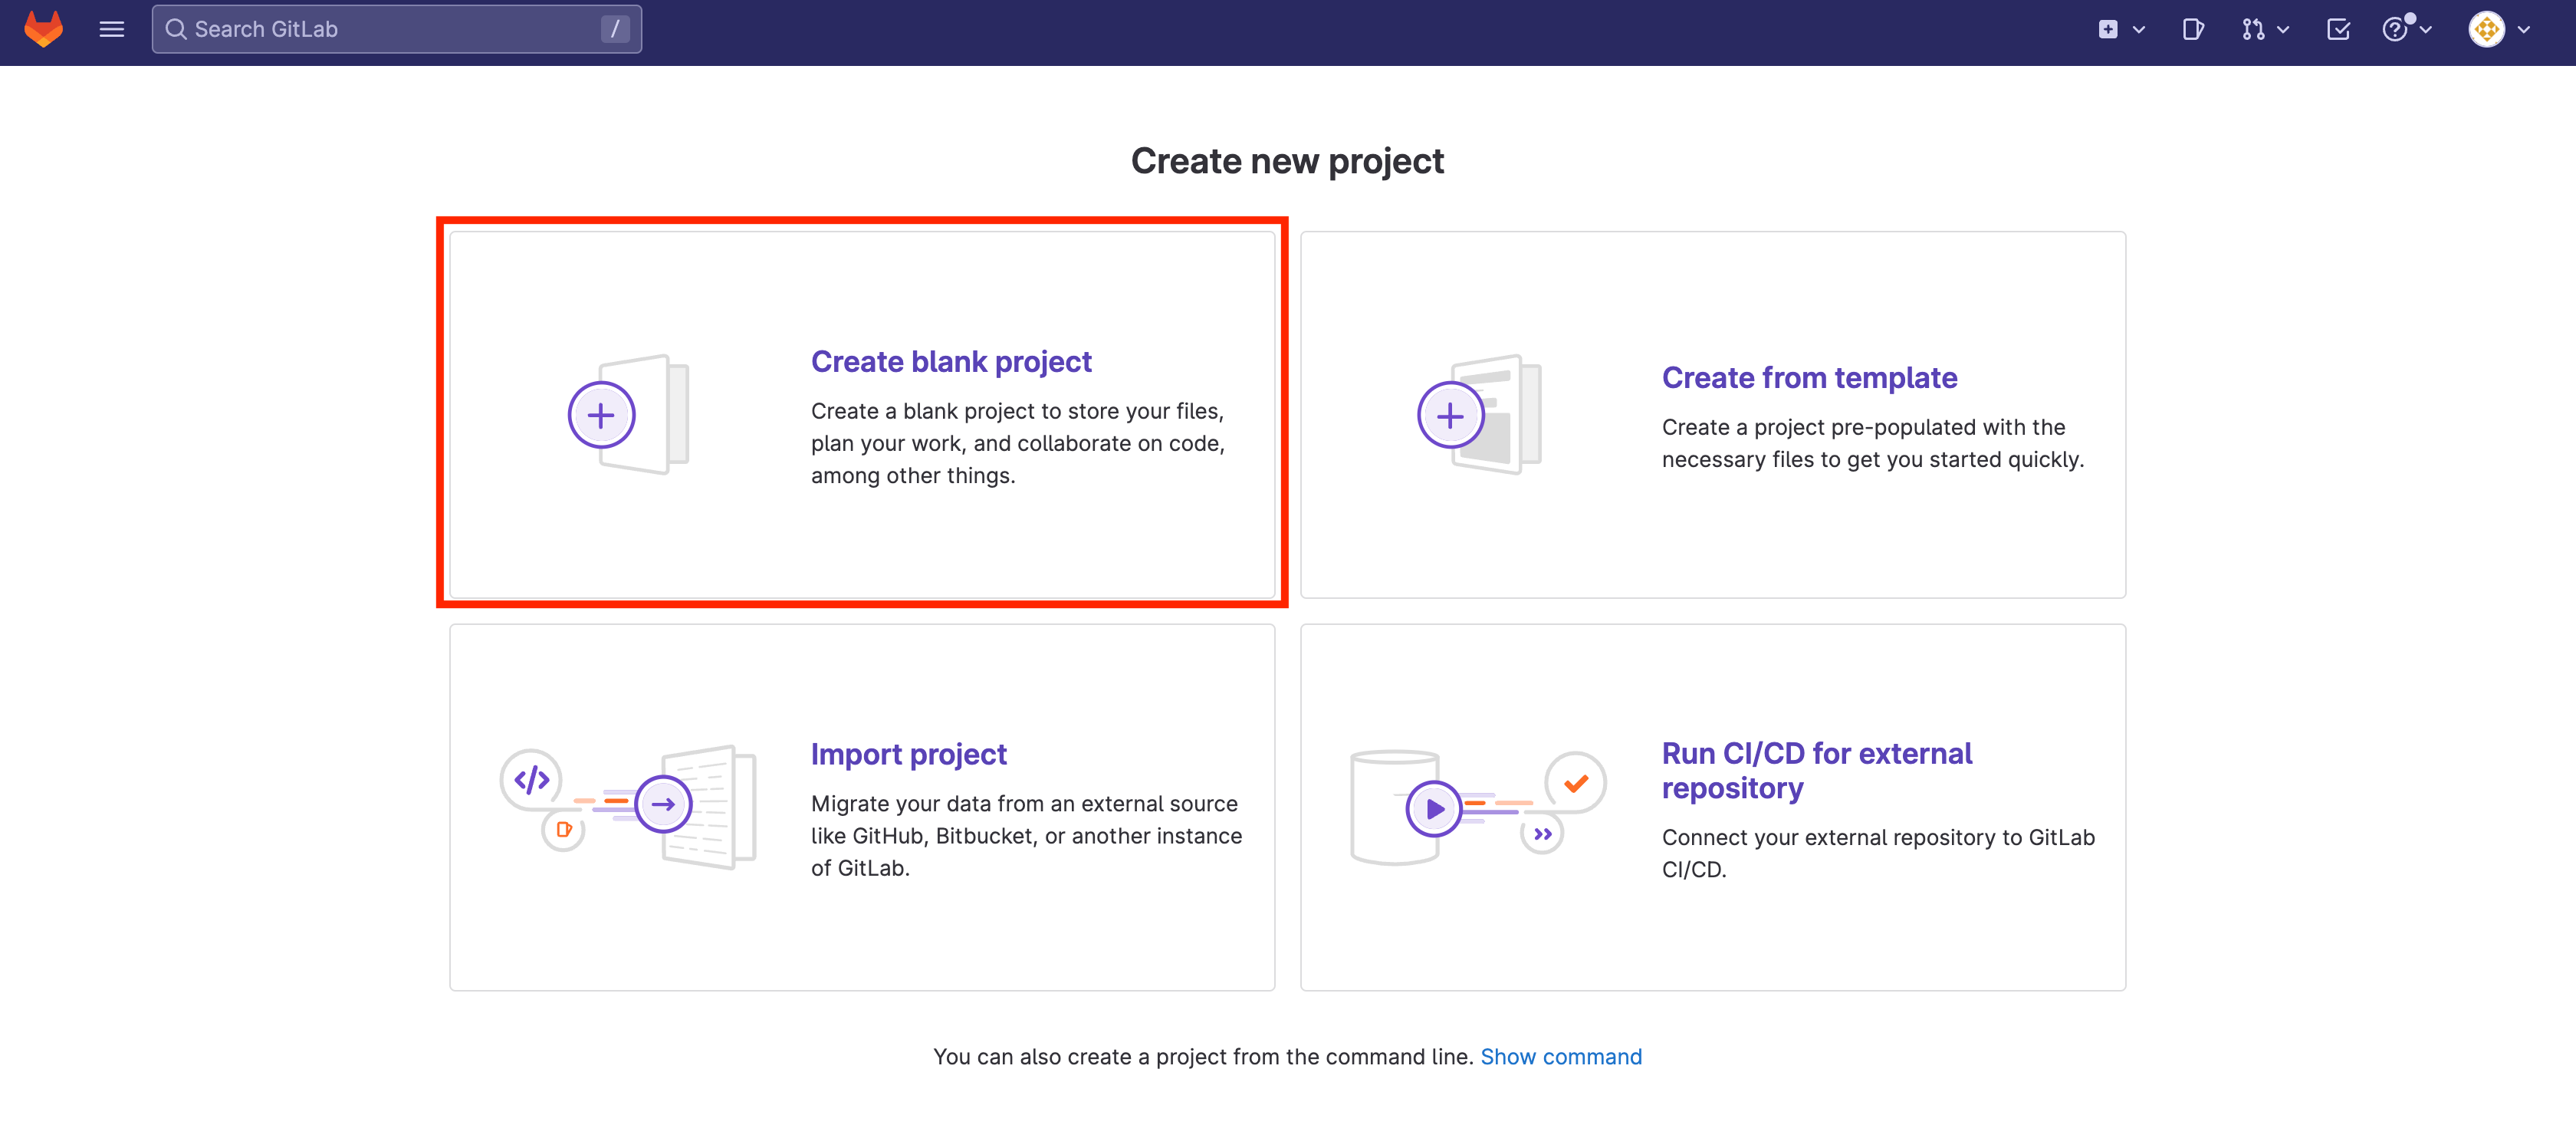
(AJ Canlas, CC BY-SA 4.0)
Name your project. GitLab generates a unique project URL for you. This project contains the repository for your Terraform scripts and Terraform state.
Create a personal access token
The repository needs a personal access token to manage this Terraform state. In your profile, select Edit Profile:
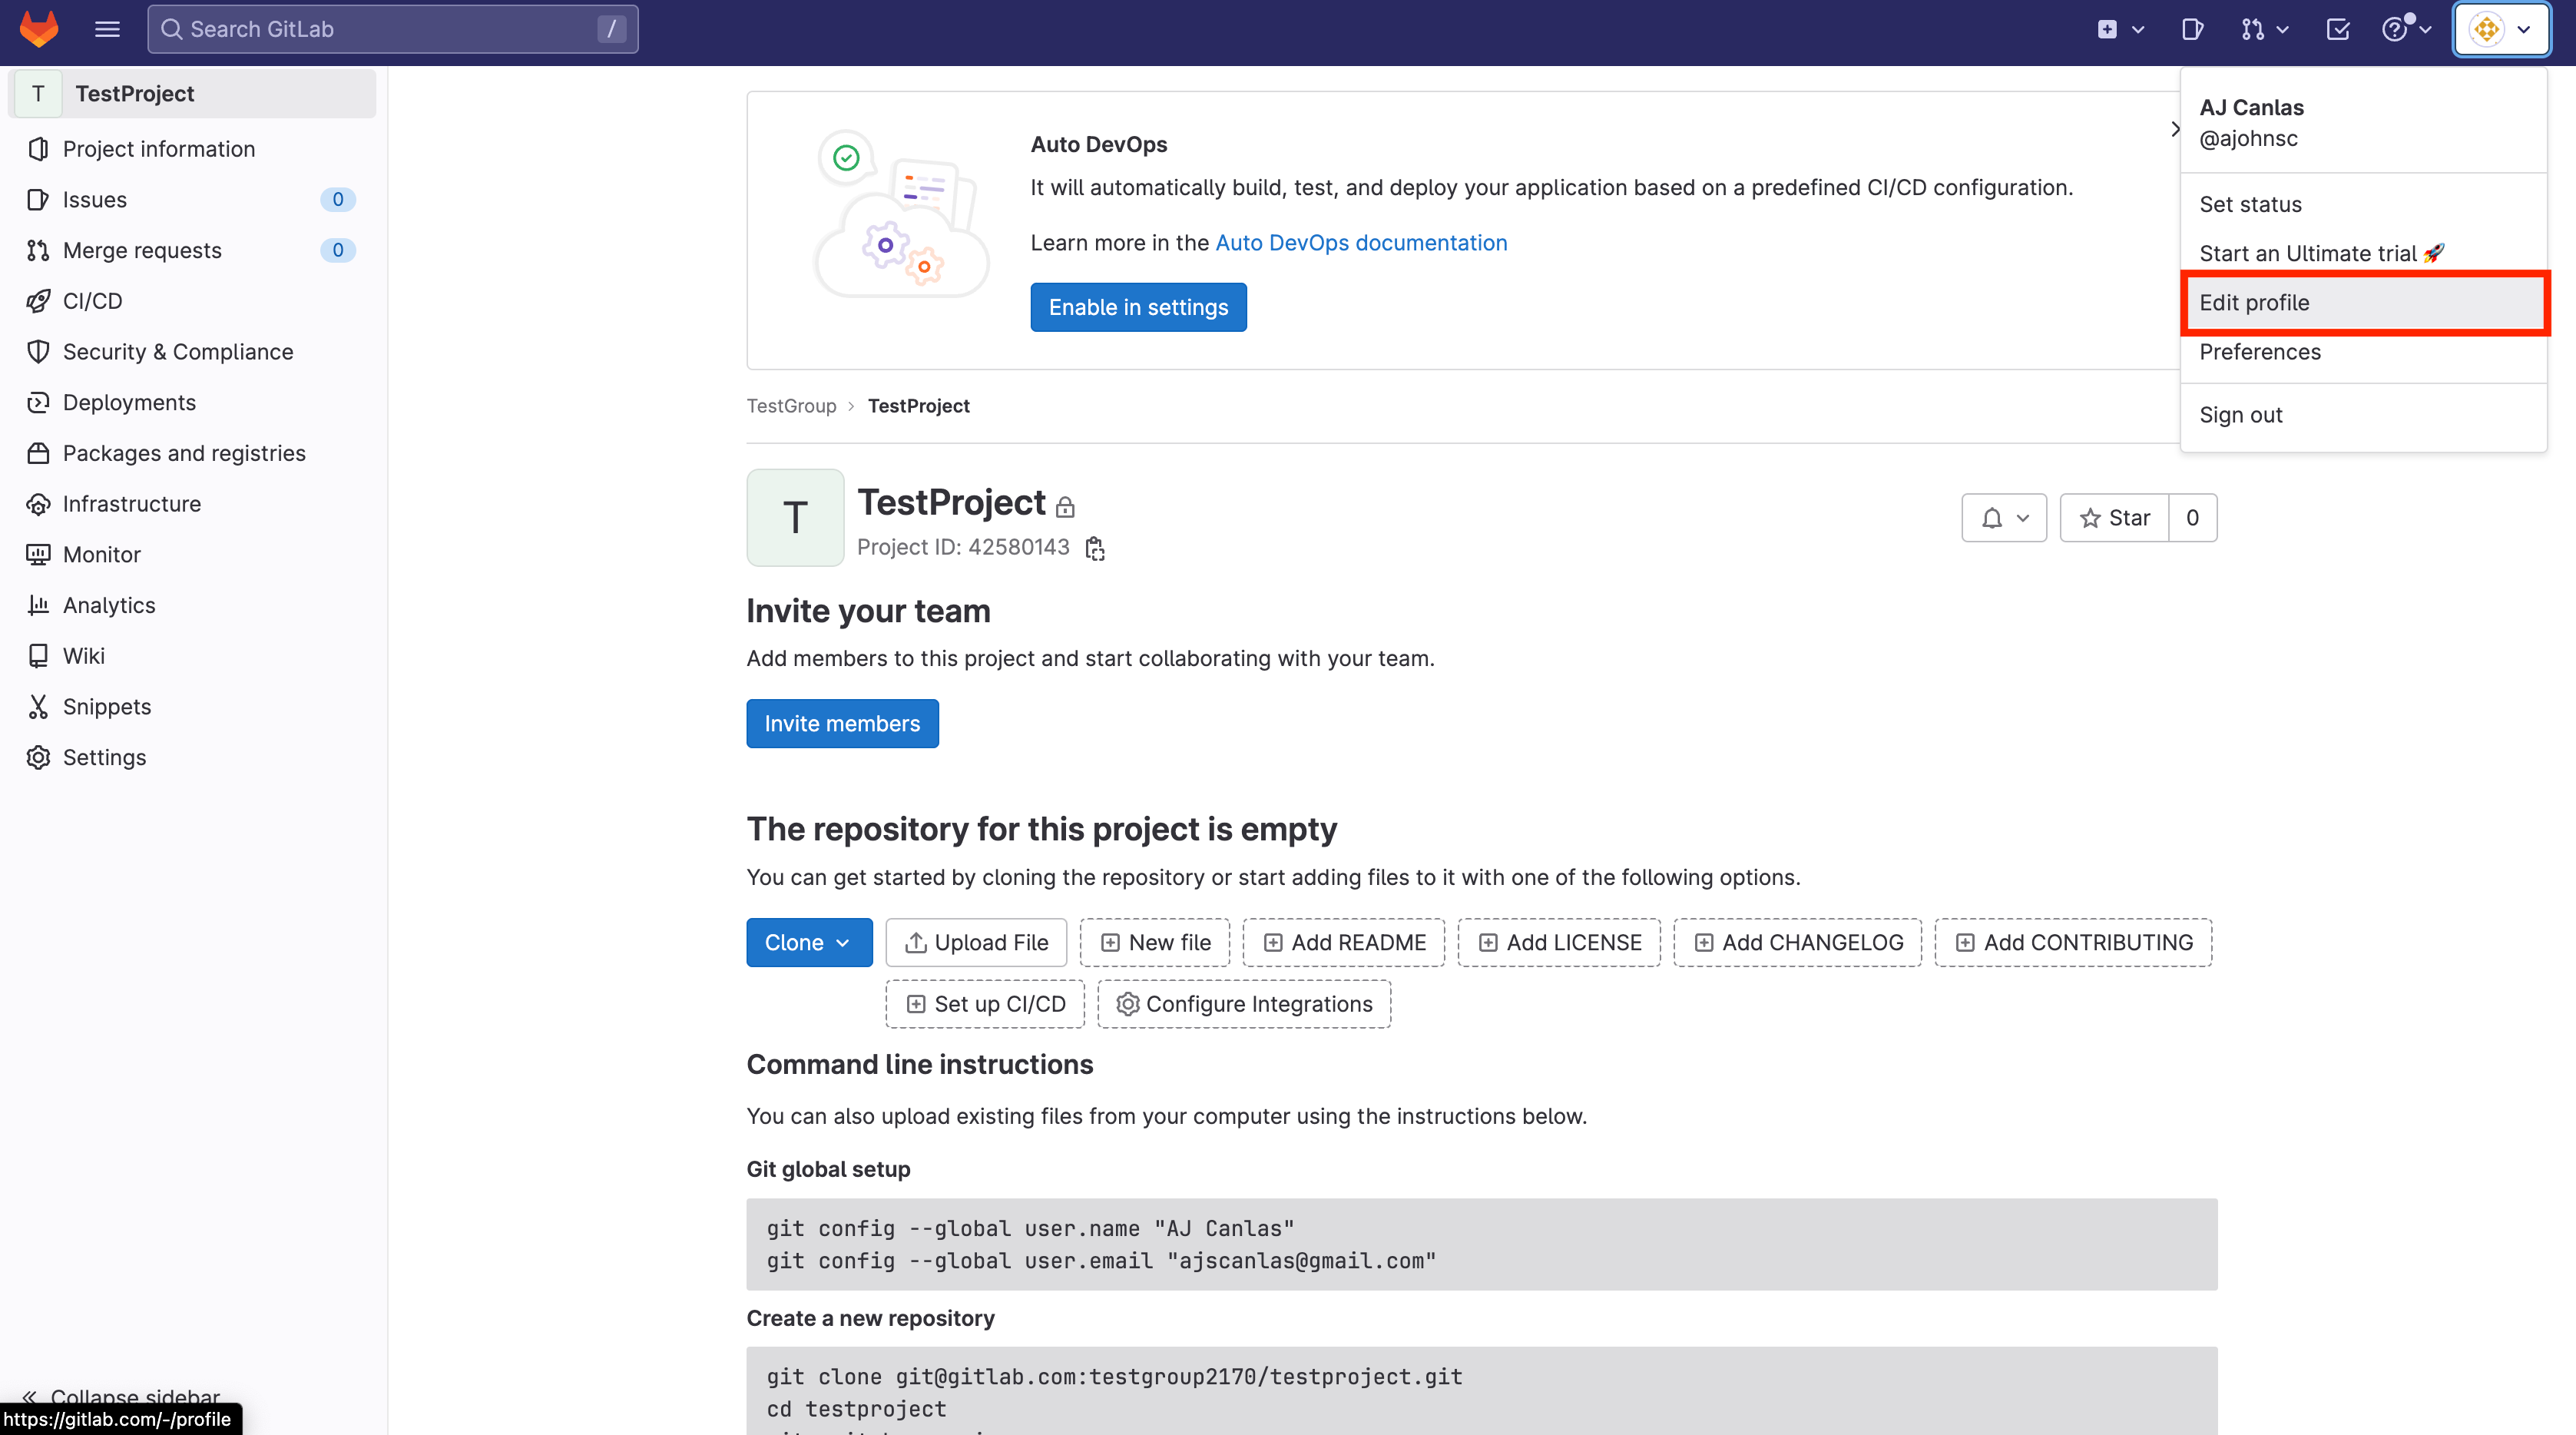
(AJ Canlas, CC BY-SA 4.0)
Click Access Token in the side panel to access a menu for creating an access token. Save your token because you can’t view it again.
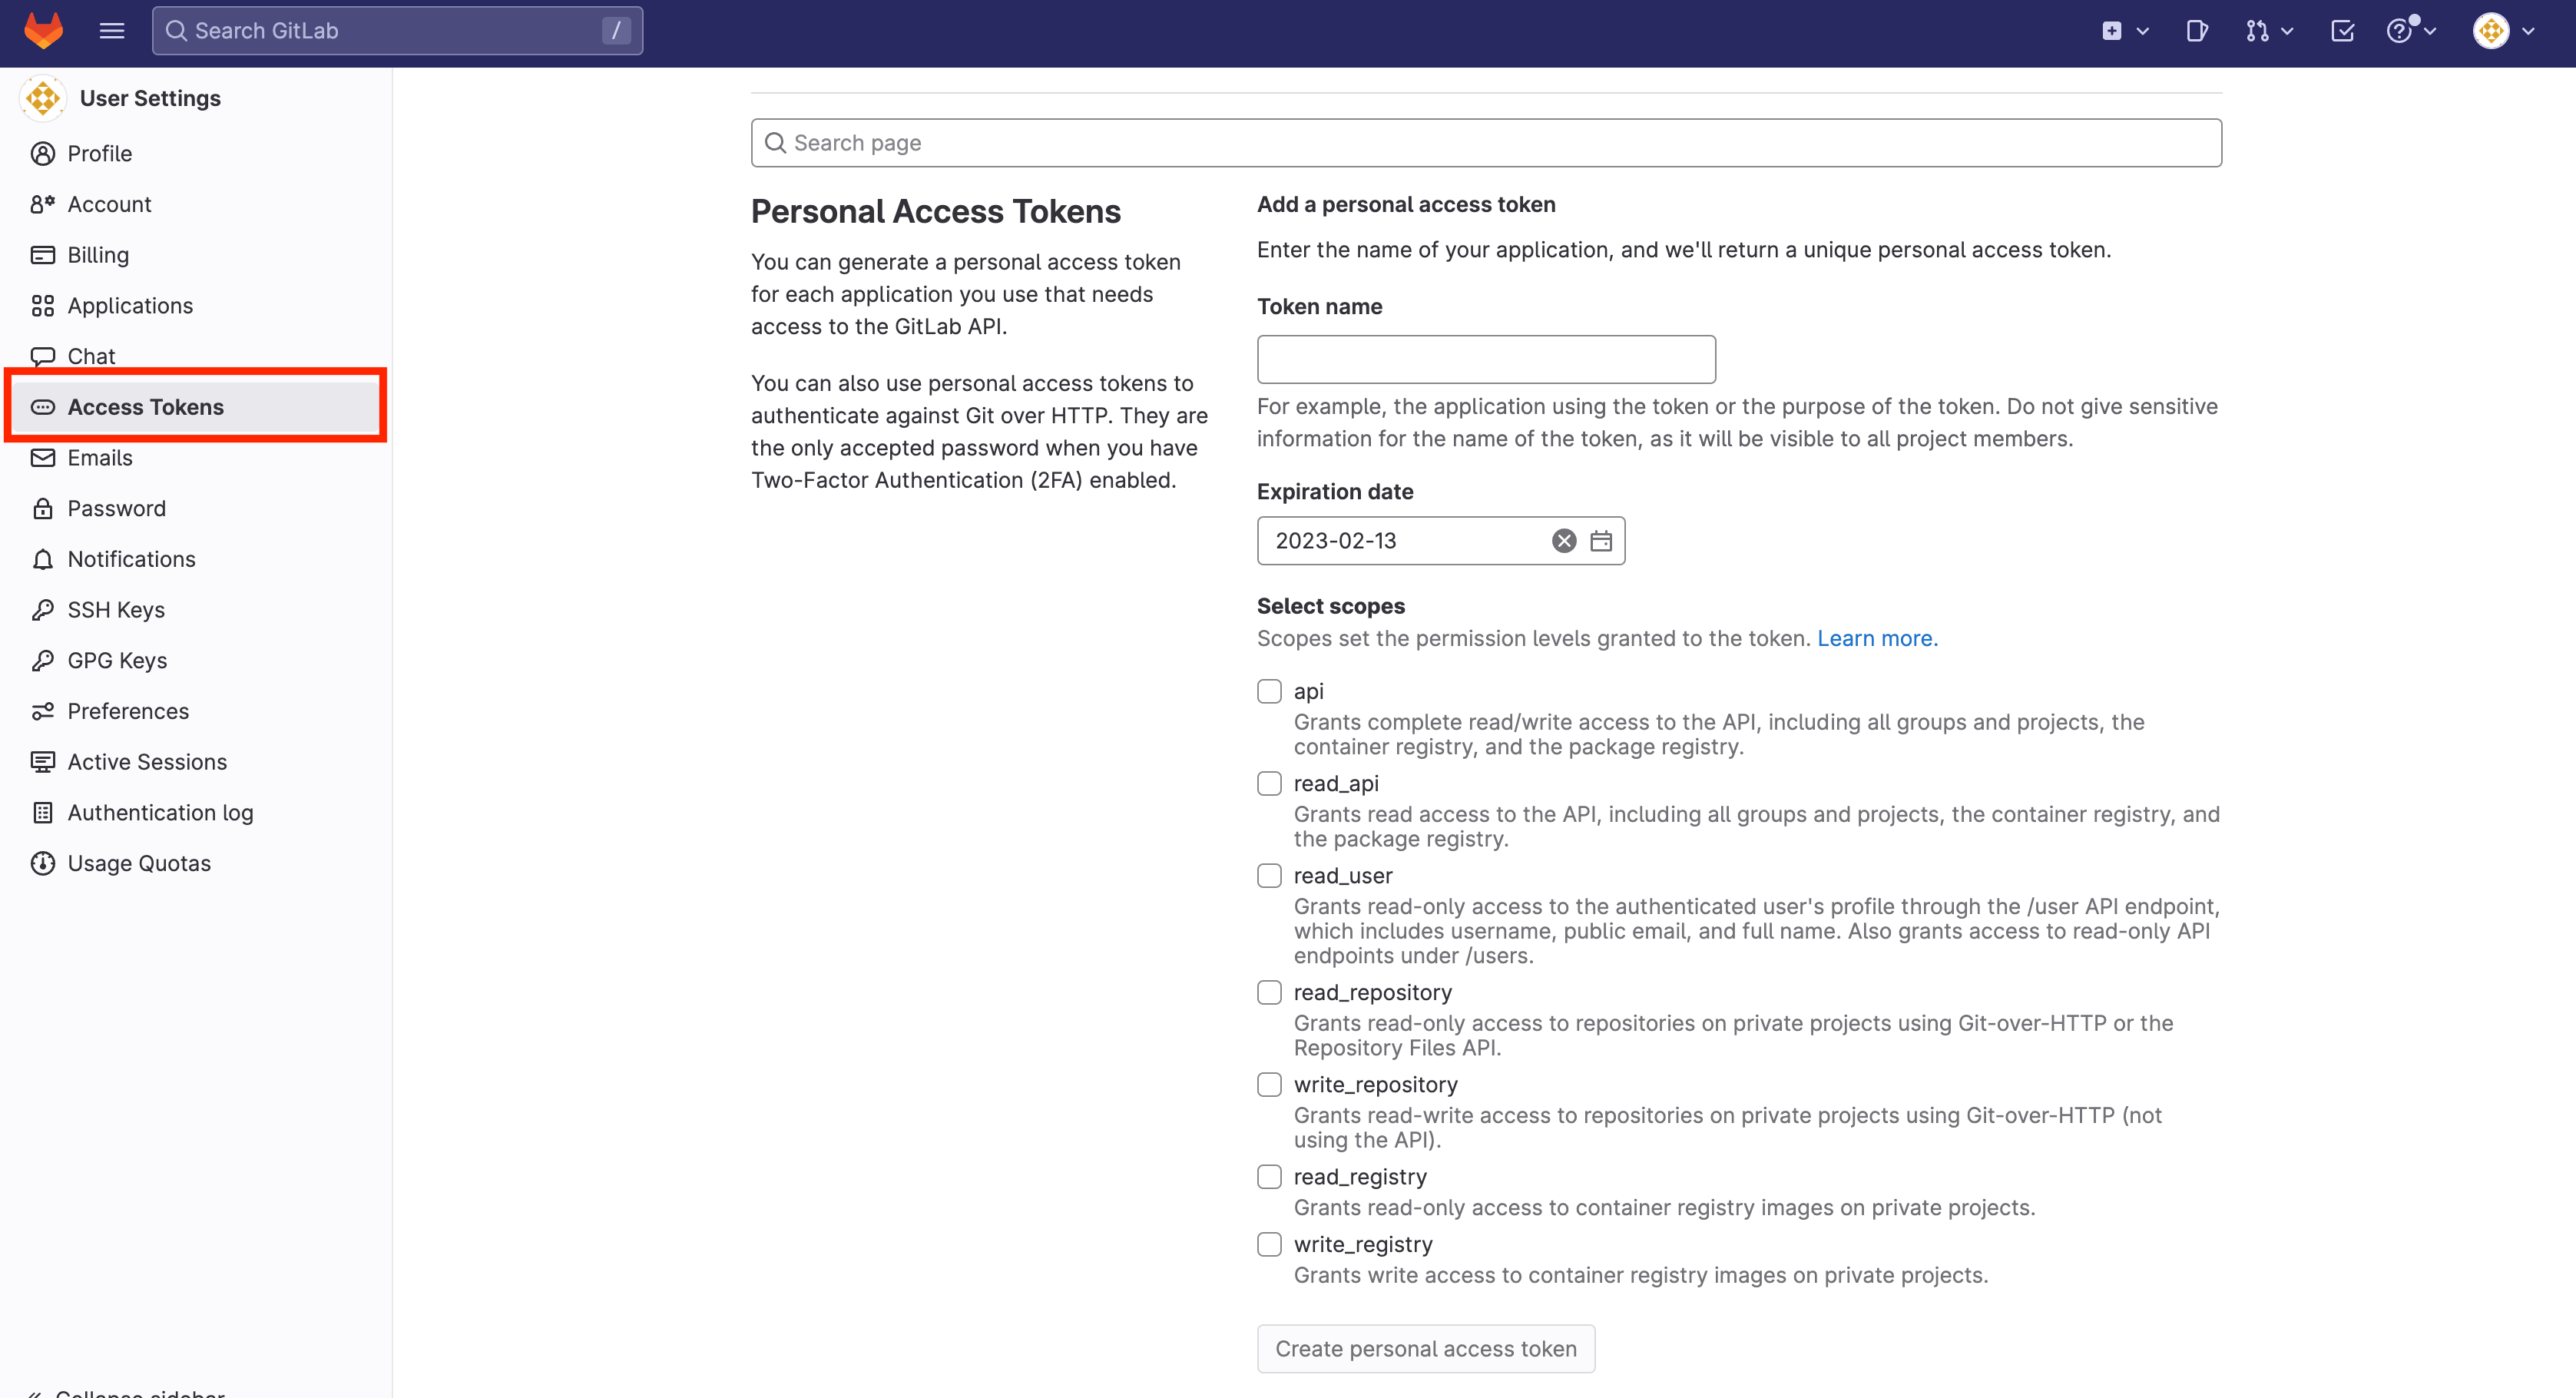
(AJ Canlas, CC BY-SA 4.0)
Clone the empty repository
On a computer with direct access to your OpenStack installation, clone the repository and then change to the resulting directory:
$ git clone git@gitlab.com:testgroup2170/testproject.git $ cd testproject
Create the backend .tf and provider file
Create a backend file to configure GitLab as your state backend:
$ cat >> backend.tf << EOF terraform { backend "http" { } } EOF
This provider file pulls the provider for OpenStack:
$ cat >> provider.tf << EOF terraform { required_version = ">= 0.14.0" required_providers { openstack = { source = "terraform-provider-openstack/openstack" version = "1.49.0" } } } provider "openstack" { user_name = var.OS_USERNAME tenant_name = var.OS_TENANT password = var.OS_PASSWORD auth_url = var.OS_AUTH_URL region = var.OS_REGION } EOF
Because you've declared a variable in the provider, you must declare it in a variable file:
$ cat >> variables.tf << EOF variable "OS_USERNAME" { type = string description = "OpenStack Username" } variable "OS_TENANT" { type = string description = "OpenStack Tenant/Project Name" } variable "OS_PASSWORD" { type = string description = "OpenStack Password" } variable "OS_AUTH_URL" { type = string description = "OpenStack Identitiy/Keystone API for authentication" } variable "OS_REGION" { type = string description = "OpenStack Region" } EOF
Because you're initially working locally, you must set those variables to make it work:
$ cat >> terraform.tfvars << EOF OS_USERNAME = "admin" OS_TENANT = "admin" OS_PASSWORD = "YYYYYYYYYYYYYYYYYYYYYY" OS_AUTH_URL = "http://X.X.X.X:35357/v3" OS_REGION = "RegionOne" EOF
These details are available on your rc file on OpenStack.
Initialize the project in Terraform
Initializing the project is quite different because you need to tell Terraform to use GitLab as your state backend:
PROJECT_ID="" TF_USERNAME="" TF_PASSWORD="" TF_STATE_NAME="" TF_ADDRESS="https://gitlab.com/api/v4/projects/$ {PROJECT_ID}/terraform/state/$ {TF_STATE_NAME}" $ terraform init \ -backend-config=address=$ {TF_ADDRESS} \ -backend-config=lock_address=$ {TF_ADDRESS}/lock \ -backend-config=unlock_address=$ {TF_ADDRESS}/lock \ -backend-config=username=$ {TF_USERNAME} \ -backend-config=password=$ {TF_PASSWORD} \ -backend-config=lock_method=POST \ -backend-config=unlock_method=DELETE \ -backend-config=retry_wait_min=5
To view the gitlab-project-id, look in the project details just above the Project Information tab in the side panel. It's usually your project name.
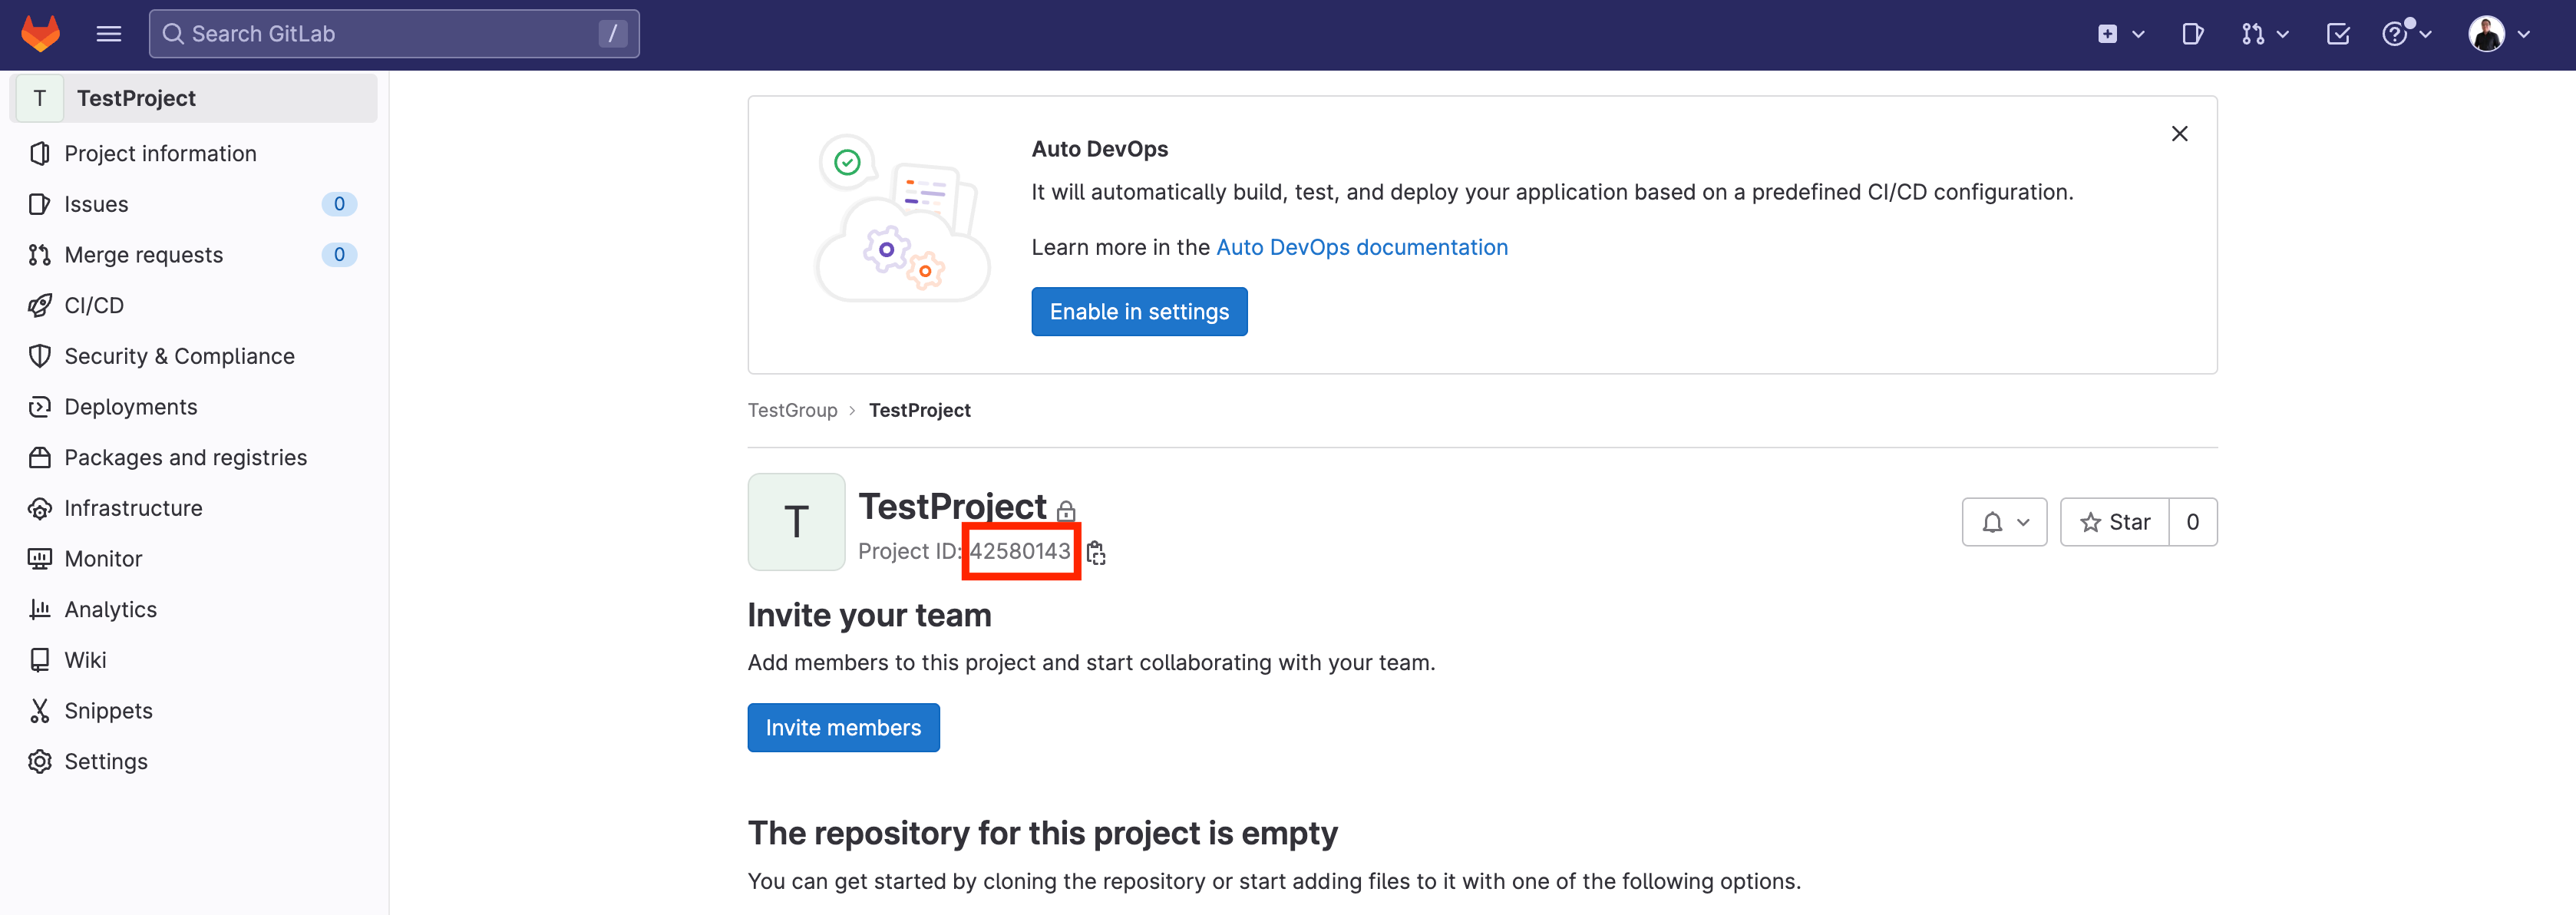
(AJ Canlas, CC BY-SA 4.0)
For me, it's 42580143.
Use your username for gitlab-username. Mine is ajohnsc.
The gitlab-personal-access-token is the token you created earlier in this exercise. In this example, I use wwwwwwwwwwwwwwwwwwwww. You can name your-unique-state-name anything. I used homelab.
Here is my initialization script:
PROJECT_ID="42580143" TF_USERNAME="ajohnsc" TF_PASSWORD="wwwwwwwwwwwwwwwwwwwww" TF_STATE_NAME="homelab" TF_ADDRESS="https://gitlab.com/api/v4/projects/$ {PROJECT_ID}/terraform/state/$ {TF_STATE_NAME}"
To use the file:
$ terraform init \ -backend-config=address=$ {TF_ADDRESS} \ -backend-config=lock_address=$ {TF_ADDRESS}/lock \ -backend-config=unlock_address=$ {TF_ADDRESS}/lock \ -backend-config=username=$ {TF_USERNAME} \ -backend-config=password=$ {TF_PASSWORD} \ -backend-config=lock_method=POST \ -backend-config=unlock_method=DELETE \ -backend-config=retry_wait_min=5
The output is similar to this:
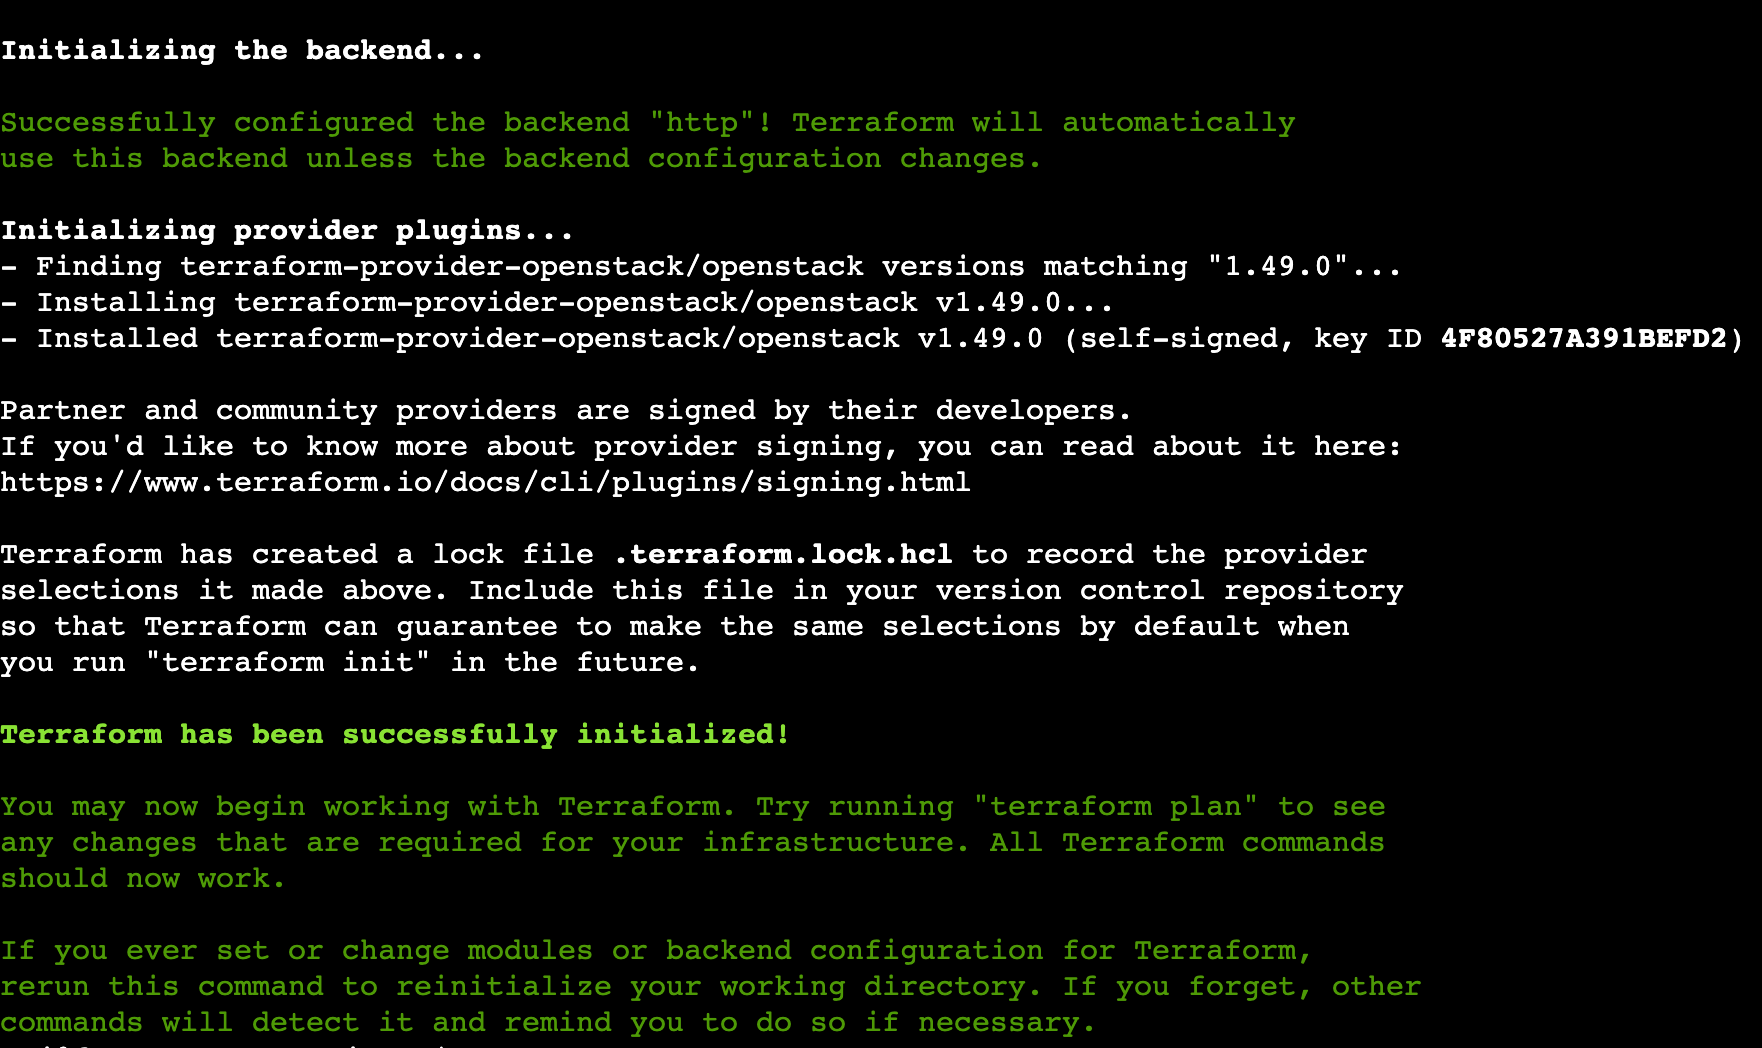
(AJ Canlas, CC BY-SA 4.0)
Test the Terraform script
This sets the size of the VMs for my OpenStack flavors:
$ cat >> flavors.tf << EOF resource "openstack_compute_flavor_v2" "small-flavor" { name = "small" ram = "4096" vcpus = "1" disk = "0" flavor_id = "1" is_public = "true" } resource "openstack_compute_flavor_v2" "medium-flavor" { name = "medium" ram = "8192" vcpus = "2" disk = "0" flavor_id = "2" is_public = "true" } resource "openstack_compute_flavor_v2" "large-flavor" { name = "large" ram = "16384" vcpus = "4" disk = "0" flavor_id = "3" is_public = "true" } resource "openstack_compute_flavor_v2" "xlarge-flavor" { name = "xlarge" ram = "32768" vcpus = "8" disk = "0" flavor_id = "4" is_public = "true" } EOF
The settings for my external network are as follows:
$ cat >> external-network.tf << EOF resource "openstack_networking_network_v2" "external-network" { name = "external-network" admin_state_up = "true" external = "true" segments { network_type = "flat" physical_network = "physnet1" } } resource "openstack_networking_subnet_v2" "external-subnet" { name = "external-subnet" network_id = openstack_networking_network_v2.external-network.id cidr = "10.0.0.0/8" gateway_ip = "10.0.0.1" dns_nameservers = ["10.0.0.254", "10.0.0.253"] allocation_pool { start = "10.0.0.2" end = "10.0.254.254" } } EOF
Router settings look like this:
$ cat >> routers.tf << EOF resource "openstack_networking_router_v2" "external-router" { name = "external-router" admin_state_up = true external_network_id = openstack_networking_network_v2.external-network.id } EOF
Enter the following for images:
$ cat >> images.tf << EOF resource "openstack_images_image_v2" "cirros" { name = "cirros" image_source_url = "https://download.cirros-cloud.net/0.6.1/cirros-0.6.1-x86_64-disk.img" container_format = "bare" disk_format = "qcow2" } EOF
Here is a Demo tenant:
$ cat >> demo-project-user.tf << EOF resource "openstack_identity_project_v3" "demo-project" { name = "Demo" } resource "openstack_identity_user_v3" "demo-user" { name = "demo-user" default_project_id = openstack_identity_project_v3.demo-project.id password = "demo" } EOF
When complete, you will have this file structure:
. ??? backend.tf ??? demo-project-user.tf ??? external-network.tf ??? flavors.tf ??? images.tf ??? provider.tf ??? routers.tf ??? terraform.tfvars ??? variables.tf
Issue plan
After the files are complete, you can create the plan files with the terraform plan command:
$ terraform plan Acquiring state lock. This may take a few moments... Terraform used the selected providers to generate the following execution plan. Resource actions are indicated with the following symbols: + create Terraform will perform the following actions: # openstack_compute_flavor_v2.large-flavor will be created + resource "openstack_compute_flavor_v2" "large-flavor" { + disk = 0 + extra_specs = (known after apply) + flavor_id = "3" + id = (known after apply) + is_public = true + name = "large" + ram = 16384 + region = (known after apply) + rx_tx_factor = 1 + vcpus = 4 } [...] Plan: 10 to add, Releasing state lock. This may take a few moments...
After all plan files have been created, apply them with the terraform apply command:
$ terraform apply -auto-approve Acquiring state lock. This may take a few moments... [...] Plan: 10 to add, 0 to change, 0 to destroy. openstack_compute_flavor_v2.large-flavor: Creating... openstack_compute_flavor_v2.small-flavor: Creating... openstack_identity_project_v3.demo-project: Creating... openstack_networking_network_v2.external-network: Creating... openstack_compute_flavor_v2.xlarge-flavor: Creating... openstack_compute_flavor_v2.medium-flavor: Creating... openstack_images_image_v2.cirros: Creating... [...] Releasing state lock. This may take a few moments... Apply complete! Resources: 10 added, 0 changed, 0 destroyed.
After applying the infrastructure, return to GitLab and navigate to your project. Look in Infrastructure ? Terraform to confirm that the state homelab has been created.
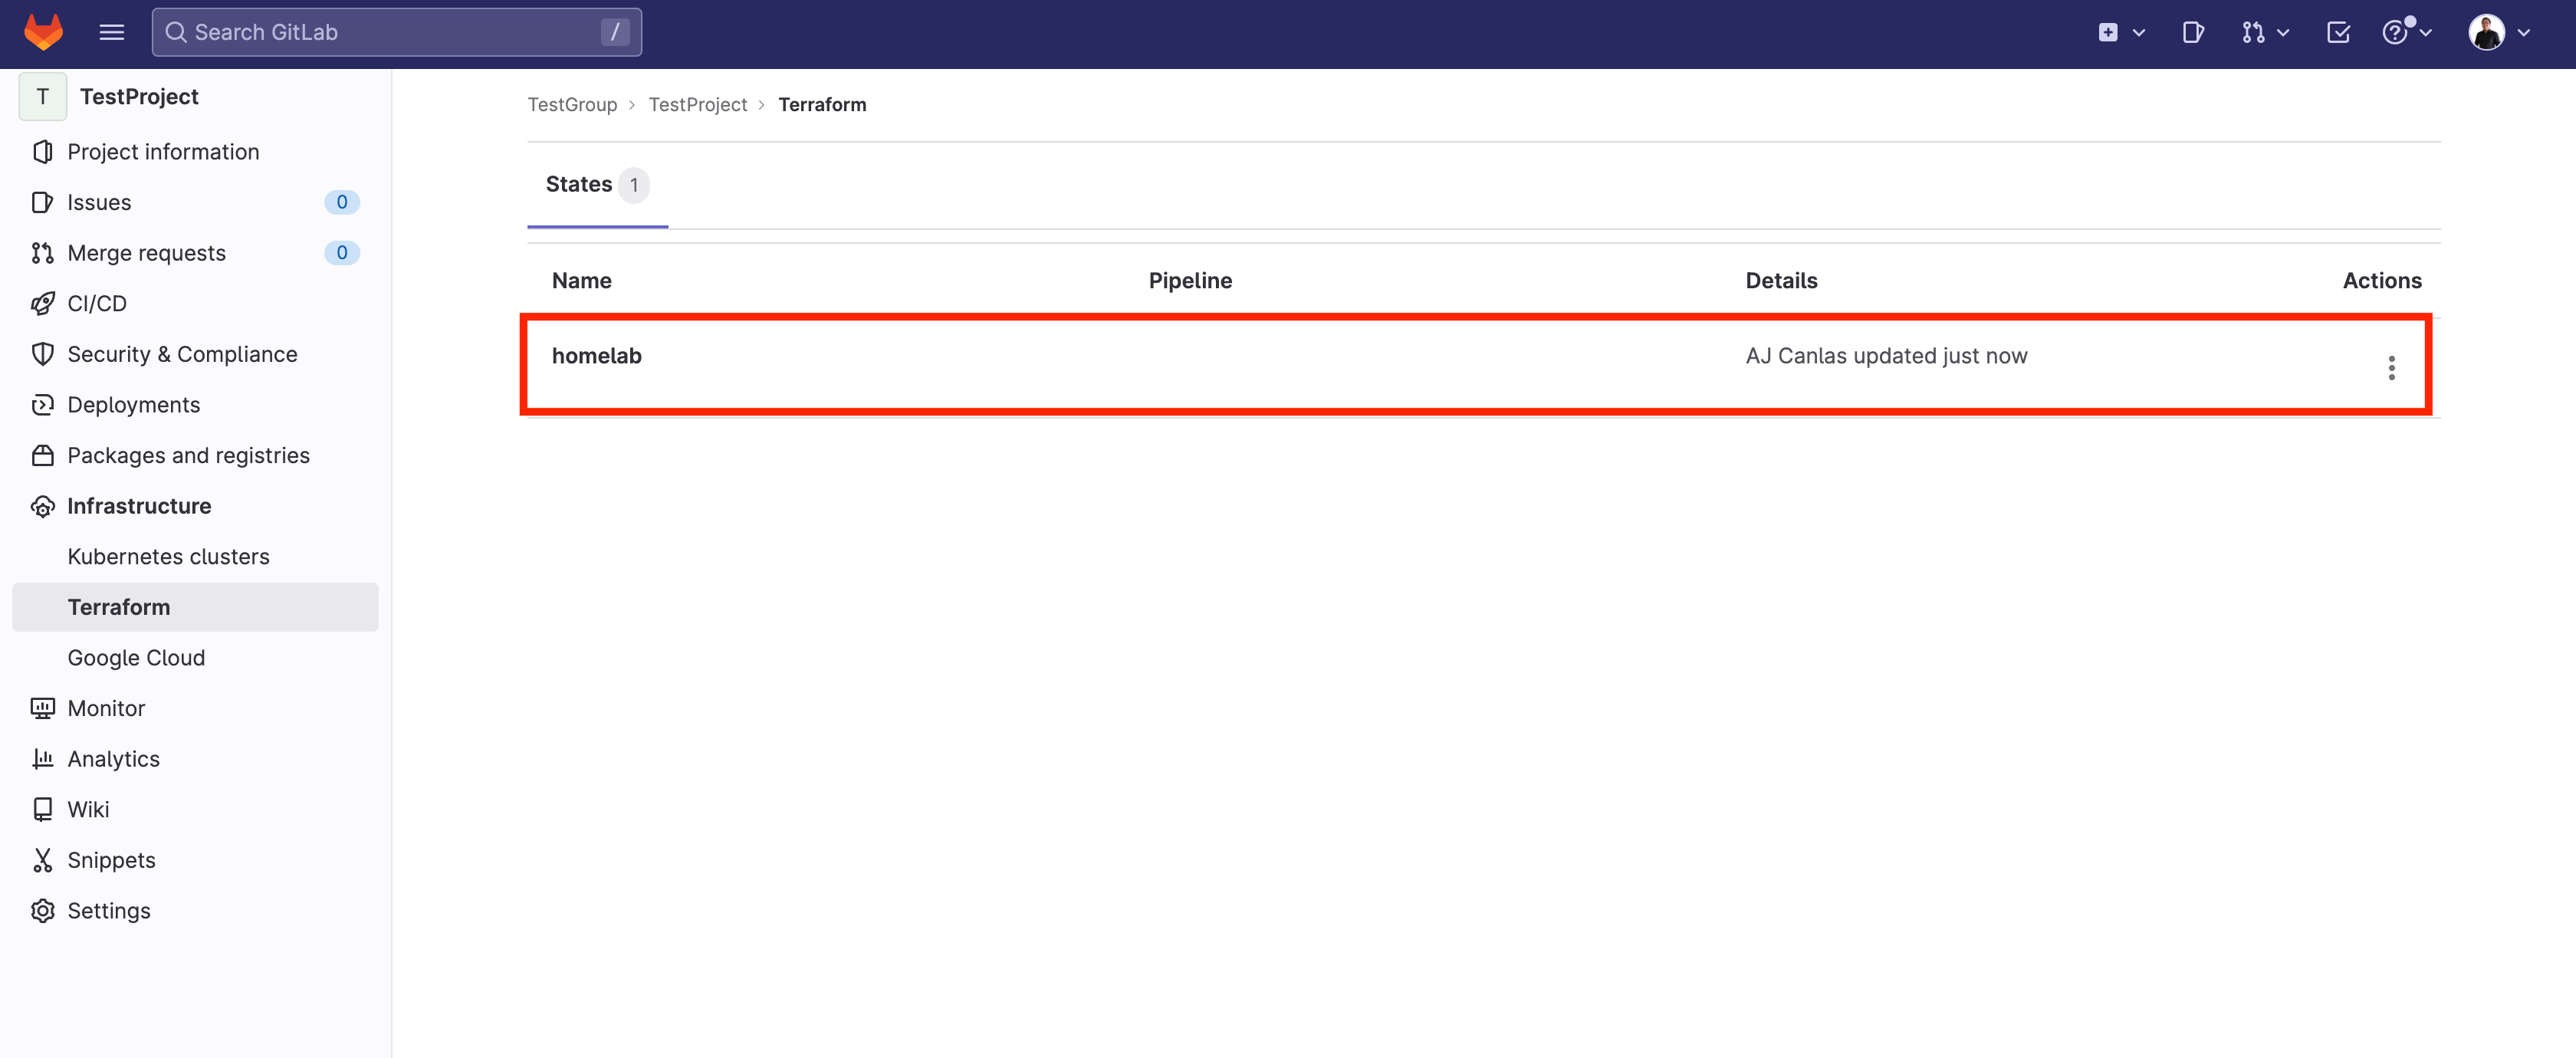
(AJ Canlas, CC BY-SA 4.0)
Destroy the state to test CI
Now that you've created a state, try destroying the infrastructure so you can apply the CI pipeline later. Of course, this is purely for moving from Terraform CLI to a Pipeline. If you have an existing infrastructure, you can skip this step.
$ terraform destroy -auto-approve Acquiring state lock. This may take a few moments... openstack_identity_project_v3.demo-project: Refreshing state... [id=5f86d4229003404998dfddc5b9f4aeb0] openstack_networking_network_v2.external-network: Refreshing state... [id=012c10f3-8a51-4892-a688-aa9b7b43f03d] [...] Plan: 0 to add, 0 to change, 10 to destroy. openstack_compute_flavor_v2.small-flavor: Destroying... [id=1] openstack_compute_flavor_v2.xlarge-flavor: Destroying... [id=4] openstack_networking_router_v2.external-router: Destroying... [id=73ece9e7-87d7-431d-ad6f-09736a02844d] openstack_compute_flavor_v2.large-flavor: Destroying... [id=3] openstack_identity_user_v3.demo-user: Destroying... [id=96b48752e999424e95bc690f577402ce] [...] Destroy complete! Resources: 10 destroyed.
You now have a state everyone can use. You can provision using a centralized state. With the proper pipeline, you can automate common tasks.
Set up a GitLab runner
Your OpenStack cluster isn't public-facing, and the OpenStack API isn't exposed. You must have a GitLab runner to run GitLab pipelines. GitLab runners are services or agents that run and perform tasks on the remote GitLab server.
On a computer on a different network, create a container for a GitLab runner:
$ docker volume create gitlab-runner-config $ docker run -d --name gitlab-runner --restart always \ -v /var/run/docker.sock:/var/run/docker.sock \ -v gitlab-runner-config:/etc/gitlab-runner \ gitlab/gitlab-runner:latest $ docker ps CONTAINER ID IMAGE COMMAND CREATED STATUS PORTS NAMES 880e2ed289d3 gitlab/gitlab-runner:latest "/usr/bin/dumb-init …" 3 seconds ago Up 2 seconds gitlab-runner-test
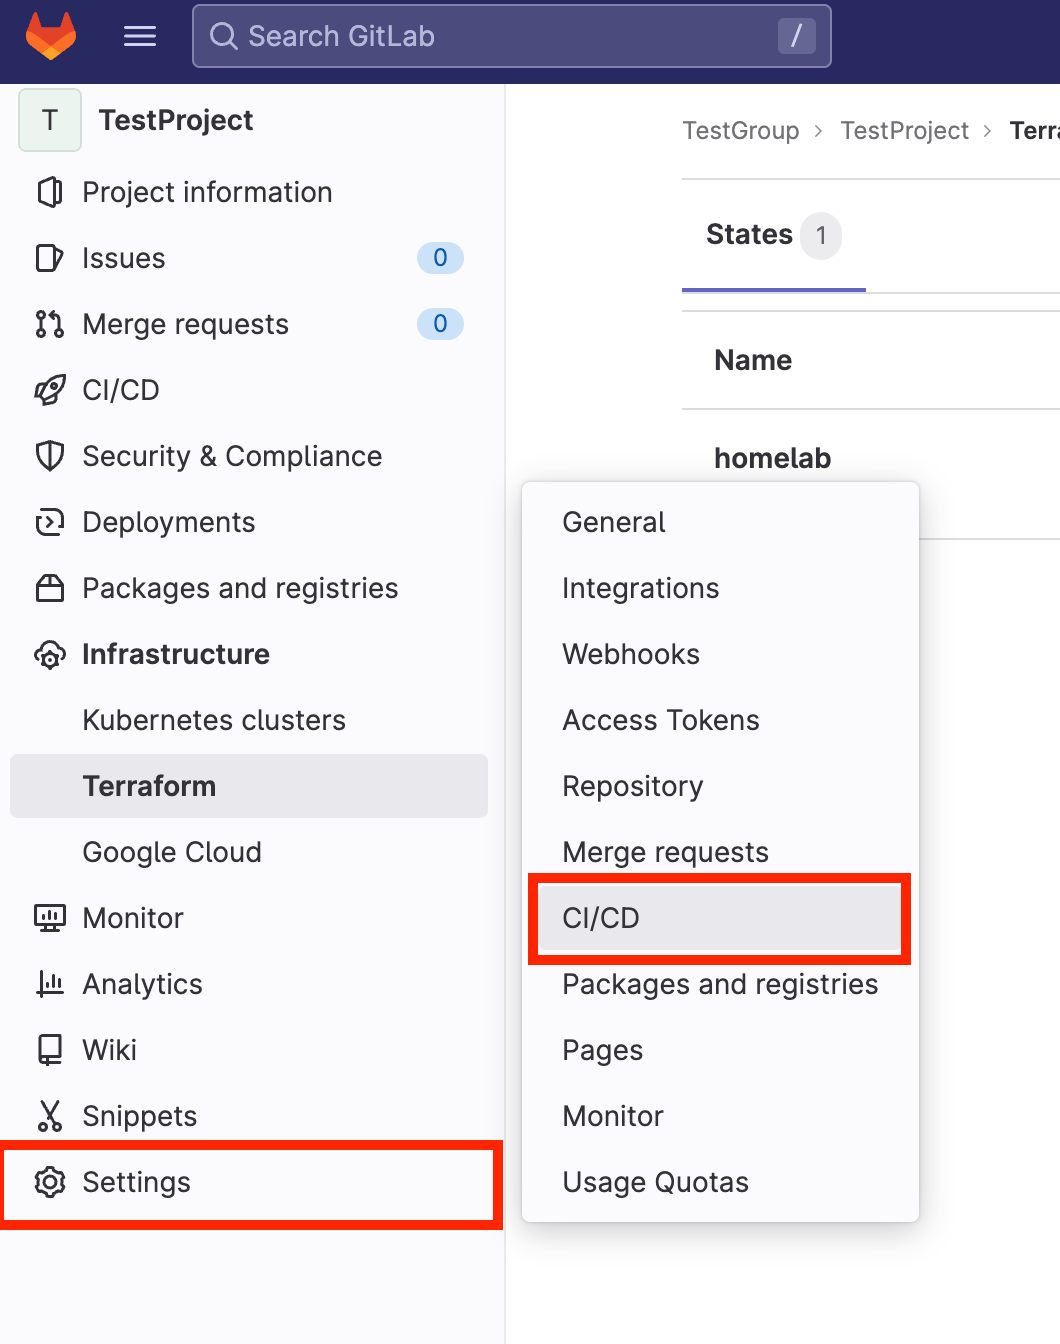
Now register it with your project in your GitLab project's Settings ? CI/CD panel:
(AJ Canlas, CC BY-SA 4.0)
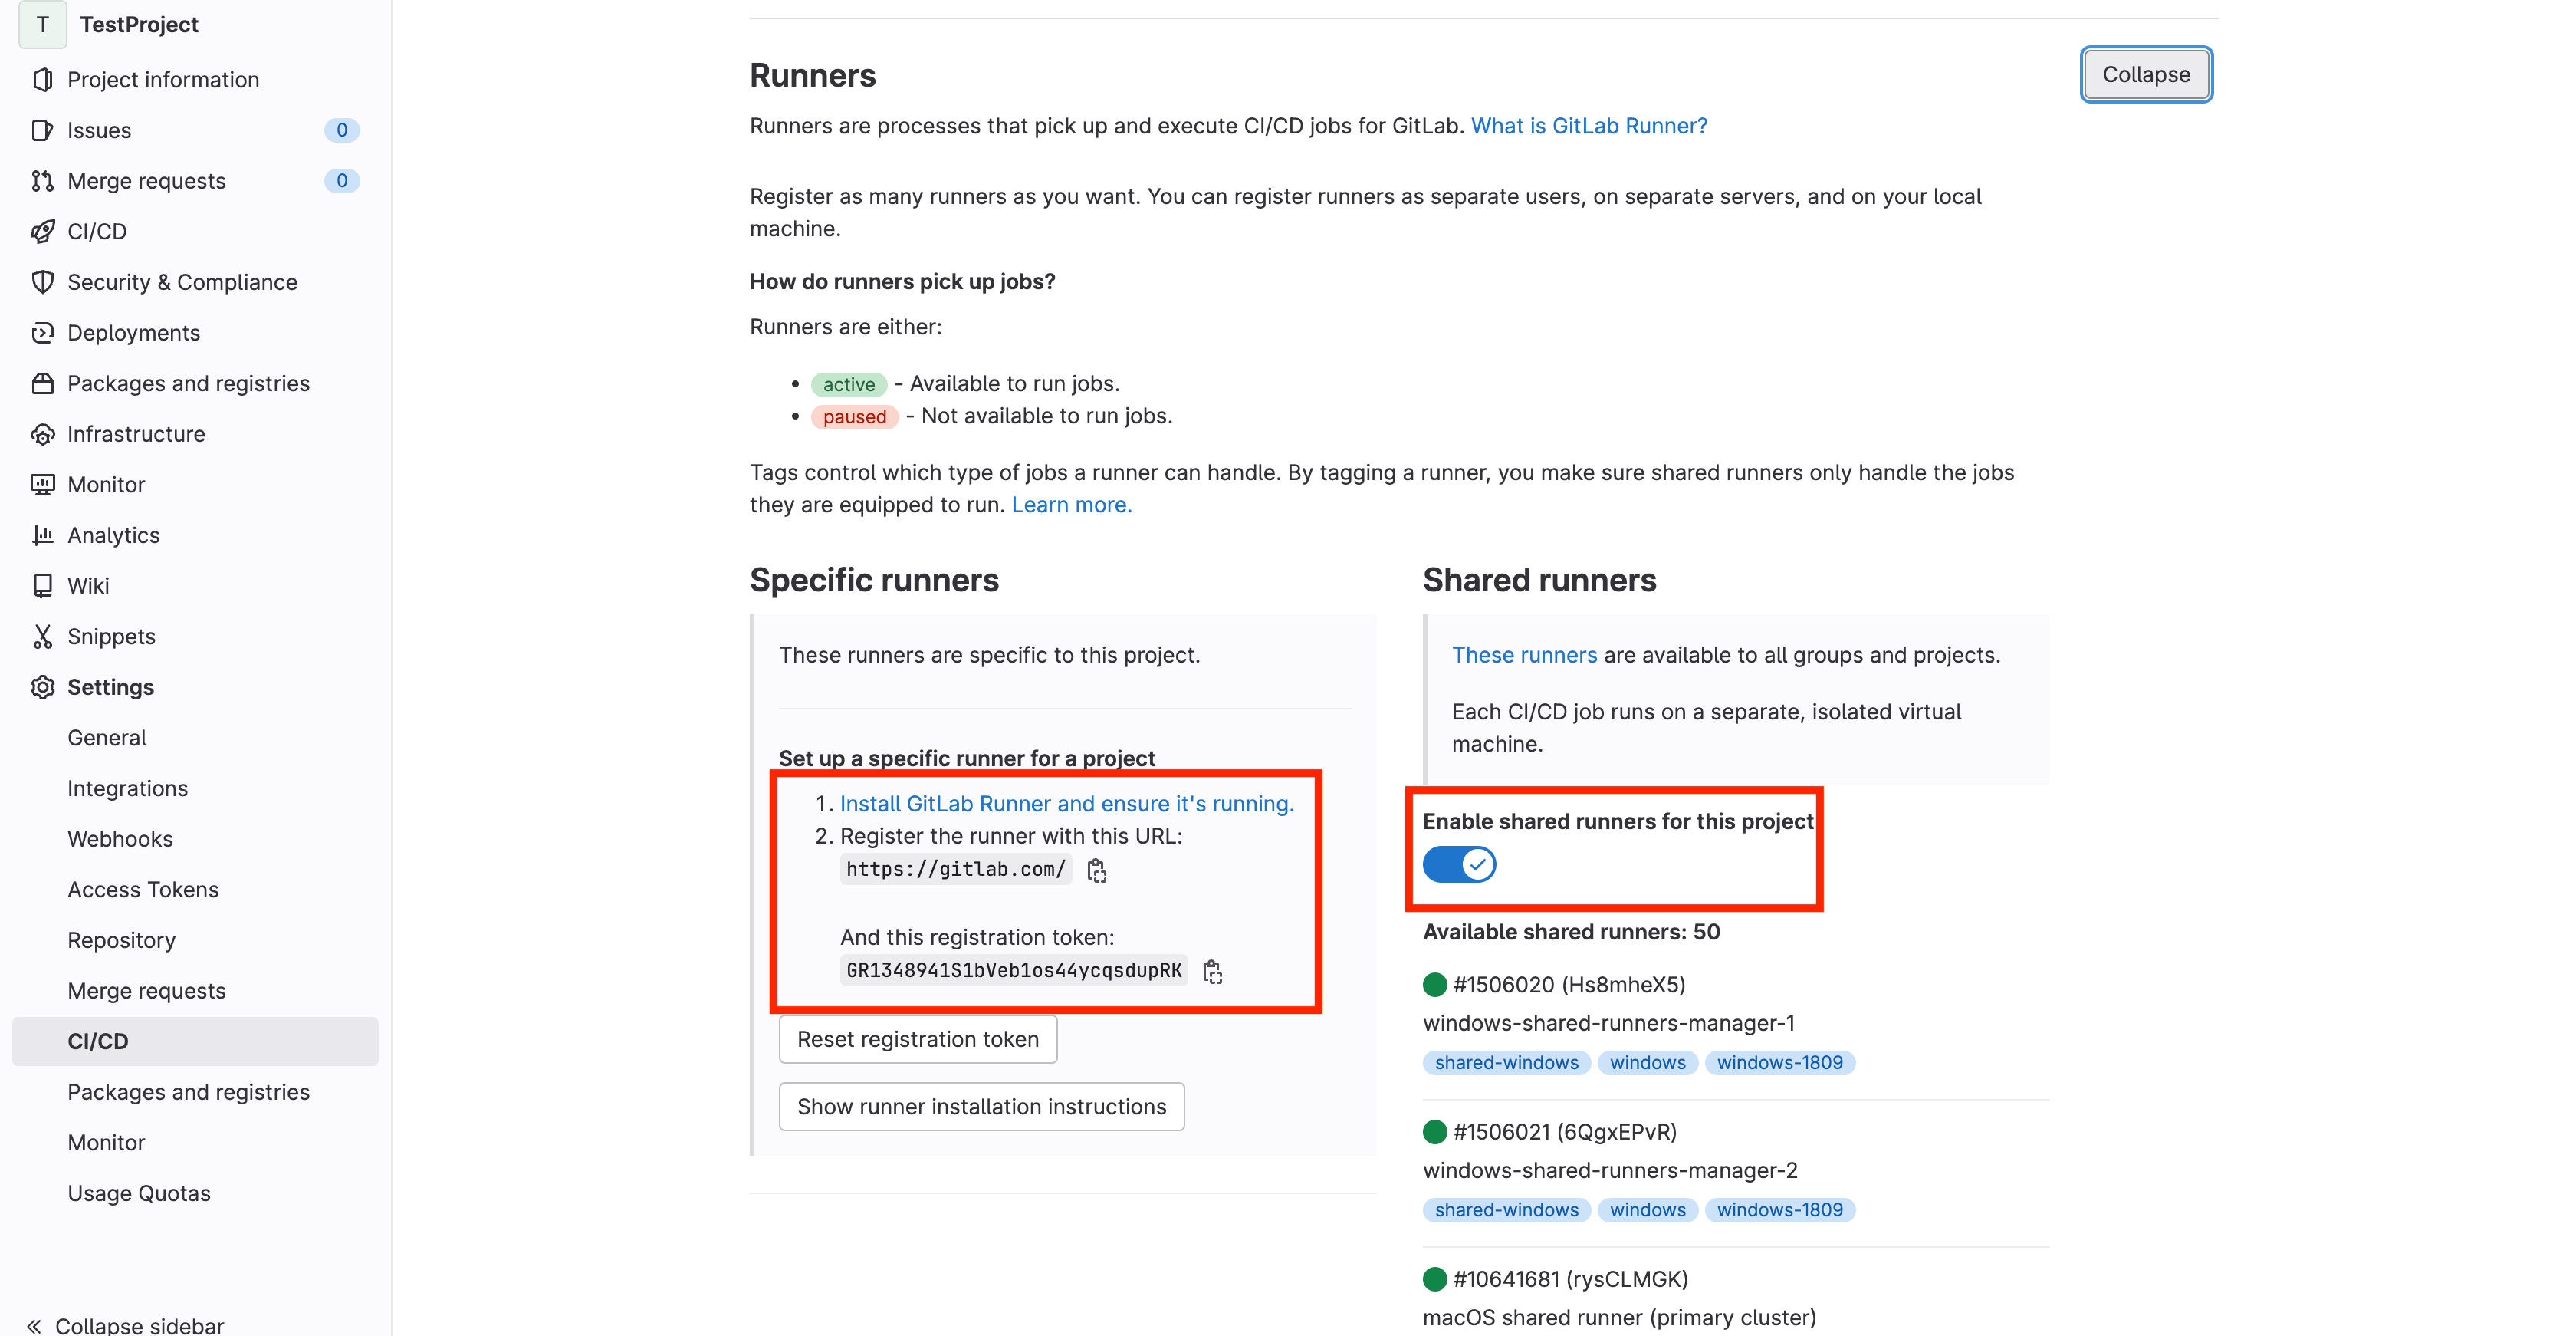
Scroll down to Runners ? Collapse:
(AJ Canlas, CC BY-SA 4.0)
The GitLab runner registration token and URL are required. Disable the shared runner on the right side to ensure it works on the runner only. Run the gitlab-runner container to register the runner:
$ docker exec -ti gitlab-runner /usr/bin/gitlab-runner register Runtime platform arch=amd64 os=linux pid=18 revision=6d480948 version=15.7.1 Running in system-mode. Enter the GitLab instance URL (for example, https://gitlab.com/): https://gitlab.com/ Enter the registration token: GR1348941S1bVeb1os44ycqsdupRK Enter a description for the runner: [880e2ed289d3]: dockerhost Enter tags for the runner (comma-separated): homelab Enter optional maintenance note for the runner: WARNING: Support for registration tokens and runner parameters in the 'register' command has been deprecated in GitLab Runner 15.6 and will be replaced with support for authentication tokens. For more information, see https://gitlab.com/gitlab-org/gitlab/-/issues/380872 Registering runner... succeeded runner=GR1348941S1bVeb1o Enter an executor: docker-ssh, shell, virtualbox, instance, kubernetes, custom, docker, parallels, ssh, docker+machine, docker-ssh+machine: docker Enter the default Docker image (for example, ruby:2.7): ajscanlas/homelab-runner:3.17 Runner registered successfully. Feel free to start it, but if it's running already the config should be automatically reloaded! Configuration (with the authentication token) was saved in "/etc/gitlab-runner/config.toml"
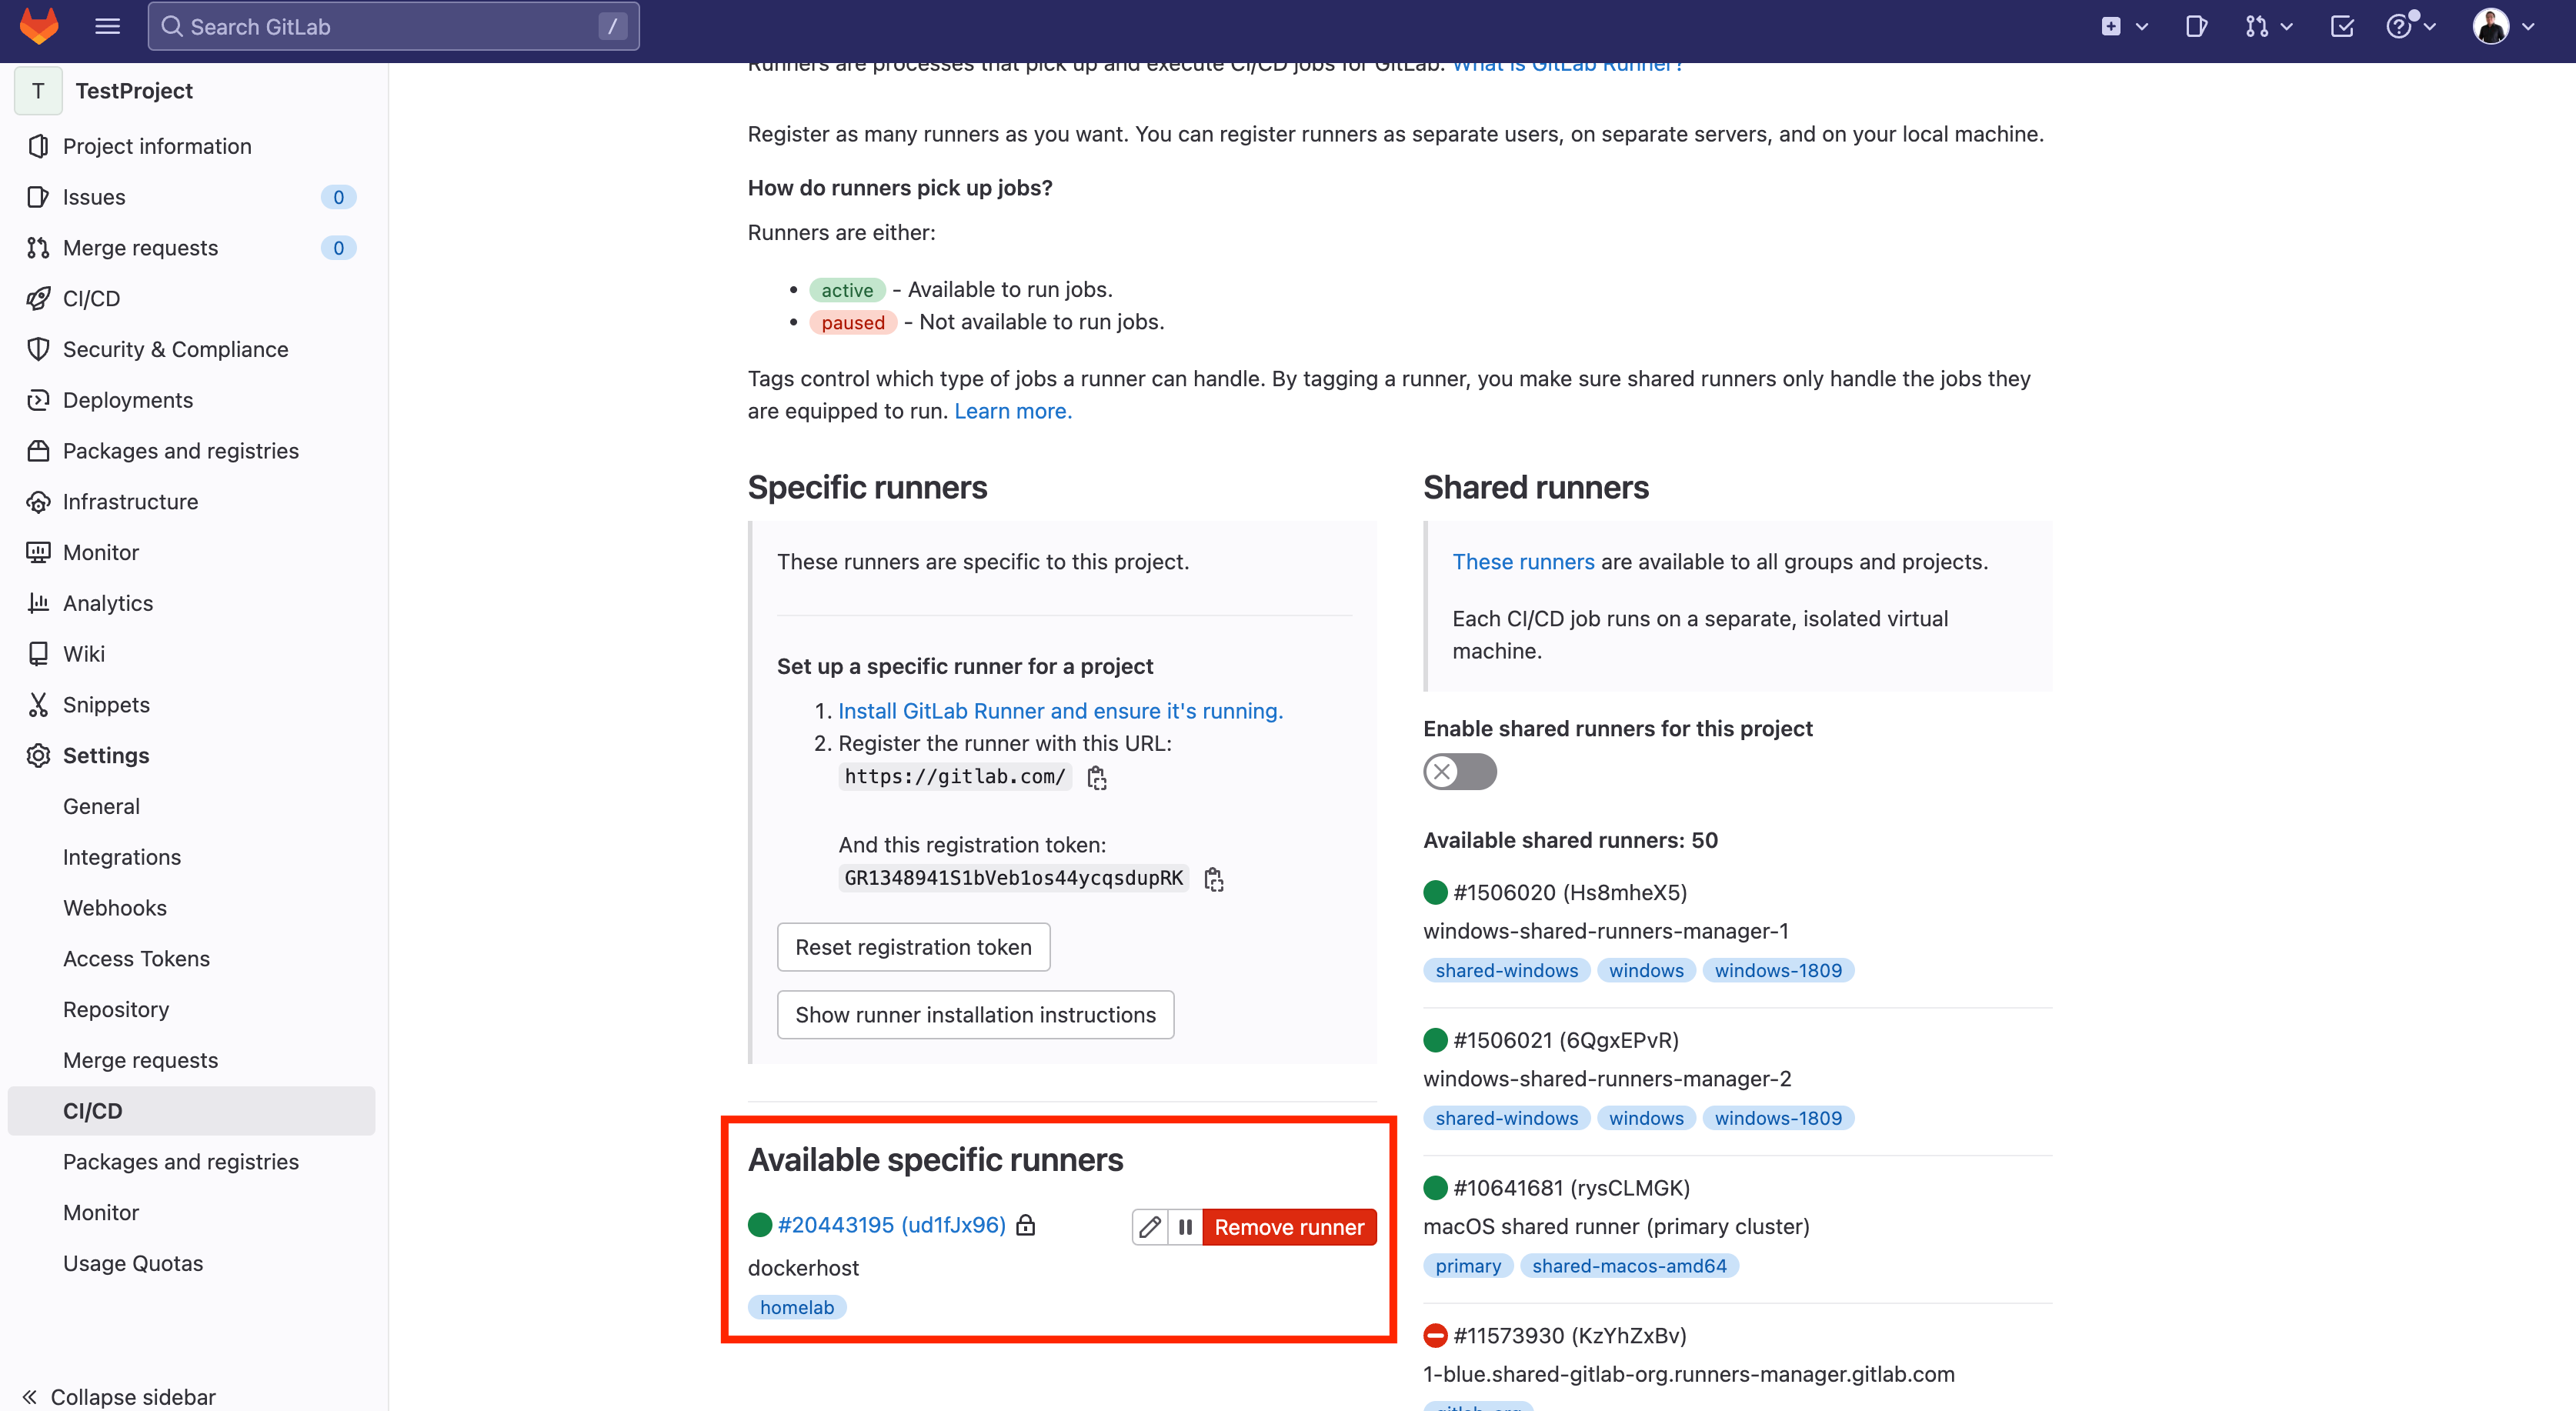
Upon success, your GitLab interface displays your runner as valid. It looks like this:
(AJ Canlas, CC BY-SA 4.0)
You can now use that runner to automate provisioning with a CI/CD pipeline in GitLab.
Set up the GitLab pipeline
Now you can set up a pipeline. Add a file named .gitlab-ci.yaml in your repository to define your CI/CD steps. Ignore the files you don't need, like .terraform directories and sensitive data like variable files.
Here's my .gitignore file:
$ cat .gitignore *.tfvars .terraform*
Here are my CI pipeline entries in .gitlab-ci.yaml:
$ cat .gitlab-ci.yaml default: tags: - homelab variables: TF_ROOT: $ {CI_PROJECT_DIR} TF_ADDRESS: $ {CI_API_V4_URL}/projects/$ {CI_PROJECT_ID}/terraform/state/homelab cache: key: homelab paths: - $ {TF_ROOT}/.terraform* stages: - prepare - validate - build - deploy before_script: - cd $ {TF_ROOT} tf-init: stage: prepare script: - terraform --version - terraform init -backend-config=address=$ {BE_REMOTE_STATE_ADDRESS} -backend-config=lock_address=$ {BE_REMOTE_STATE_ADDRESS}/lock -backend-config=unlock_address=$ {BE_REMOTE_STATE_ADDRESS}/lock -backend-config=username=$ {BE_USERNAME} -backend-config=password=$ {BE_ACCESS_TOKEN} -backend-config=lock_method=POST -backend-config=unlock_method=DELETE -backend-config=retry_wait_min=5 tf-validate: stage: validate dependencies: - tf-init variables: TF_VAR_OS_AUTH_URL: $ {OS_AUTH_URL} TF_VAR_OS_PASSWORD: $ {OS_PASSWORD} TF_VAR_OS_REGION: $ {OS_REGION} TF_VAR_OS_TENANT: $ {OS_TENANT} TF_VAR_OS_USERNAME: $ {OS_USERNAME} script: - terraform validate tf-build: stage: build dependencies: - tf-validate variables: TF_VAR_OS_AUTH_URL: $ {OS_AUTH_URL} TF_VAR_OS_PASSWORD: $ {OS_PASSWORD} TF_VAR_OS_REGION: $ {OS_REGION} TF_VAR_OS_TENANT: $ {OS_TENANT} TF_VAR_OS_USERNAME: $ {OS_USERNAME} script: - terraform plan -out "planfile" artifacts: paths: - $ {TF_ROOT}/planfile tf-deploy: stage: deploy dependencies: - tf-build variables: TF_VAR_OS_AUTH_URL: $ {OS_AUTH_URL} TF_VAR_OS_PASSWORD: $ {OS_PASSWORD} TF_VAR_OS_REGION: $ {OS_REGION} TF_VAR_OS_TENANT: $ {OS_TENANT} TF_VAR_OS_USERNAME: $ {OS_USERNAME} script: - terraform apply -auto-approve "planfile"
The process starts by declaring that every step and stage is under the homelab tag, allowing your GitLab runner to run it.
default: tags: - homelab
Next, the variables are set on the pipeline. The variables are only present when the pipeline is running:
variables: TF_ROOT: $ {CI_PROJECT_DIR} TF_ADDRESS: $ {CI_API_V4_URL}/projects/$ {CI_PROJECT_ID}/terraform/state/homelab
There's a cache that saves specific files and directories upon running from stage to stage:
cache: key: homelab paths: - $ {TF_ROOT}/.terraform*
These are the stages that the pipeline follows:
stages: - prepare - validate - build - deploy
This declares what to do before any stages are run:
before_script: - cd $ {TF_ROOT}
In the prepare stage, the tf-init initializes the Terraform scripts, gets the provider, and sets its backend to GitLab. Variables that aren't declared yet are added as environment variables later.
tf-init: stage: prepare script: - terraform --version - terraform init -backend-config=address=$ {BE_REMOTE_STATE_ADDRESS} -backend-config=lock_address=$ {BE_REMOTE_STATE_ADDRESS}/lock -backend-config=unlock_address=$ {BE_REMOTE_STATE_ADDRESS}/lock -backend-config=username=$ {BE_USERNAME} -backend-config=password=$ {BE_ACCESS_TOKEN} -backend-config=lock_method=POST -backend-config=unlock_method=DELETE -backend-config=retry_wait_min=5
In this part, the CI job tf-validate and the stage validate run Terraform to validate that the Terraform scripts are free of syntax errors. Variables not yet declared are added as environment variables later.
tf-validate: stage: validate dependencies: - tf-init variables: TF_VAR_OS_AUTH_URL: $ {OS_AUTH_URL} TF_VAR_OS_PASSWORD: $ {OS_PASSWORD} TF_VAR_OS_REGION: $ {OS_REGION} TF_VAR_OS_TENANT: $ {OS_TENANT} TF_VAR_OS_USERNAME: $ {OS_USERNAME} script: - terraform validate
Next, the CI job tf-build with the stage build creates the plan file using terraform plan and temporarily saves it using the artifacts tag.
tf-build: stage: build dependencies: - tf-validate variables: TF_VAR_OS_AUTH_URL: $ {OS_AUTH_URL} TF_VAR_OS_PASSWORD: $ {OS_PASSWORD} TF_VAR_OS_REGION: $ {OS_REGION} TF_VAR_OS_TENANT: $ {OS_TENANT} TF_VAR_OS_USERNAME: $ {OS_USERNAME} script: - terraform plan -out "planfile" artifacts: paths: - $ {TF_ROOT}/planfile
In the next section, the CI job tf-deploy with the stage deploy applies the plan file.
tf-deploy: stage: deploy dependencies: - tf-build variables: TF_VAR_OS_AUTH_URL: $ {OS_AUTH_URL} TF_VAR_OS_PASSWORD: $ {OS_PASSWORD} TF_VAR_OS_REGION: $ {OS_REGION} TF_VAR_OS_TENANT: $ {OS_TENANT} TF_VAR_OS_USERNAME: $ {OS_USERNAME} script: - terraform apply -auto-approve "planfile"
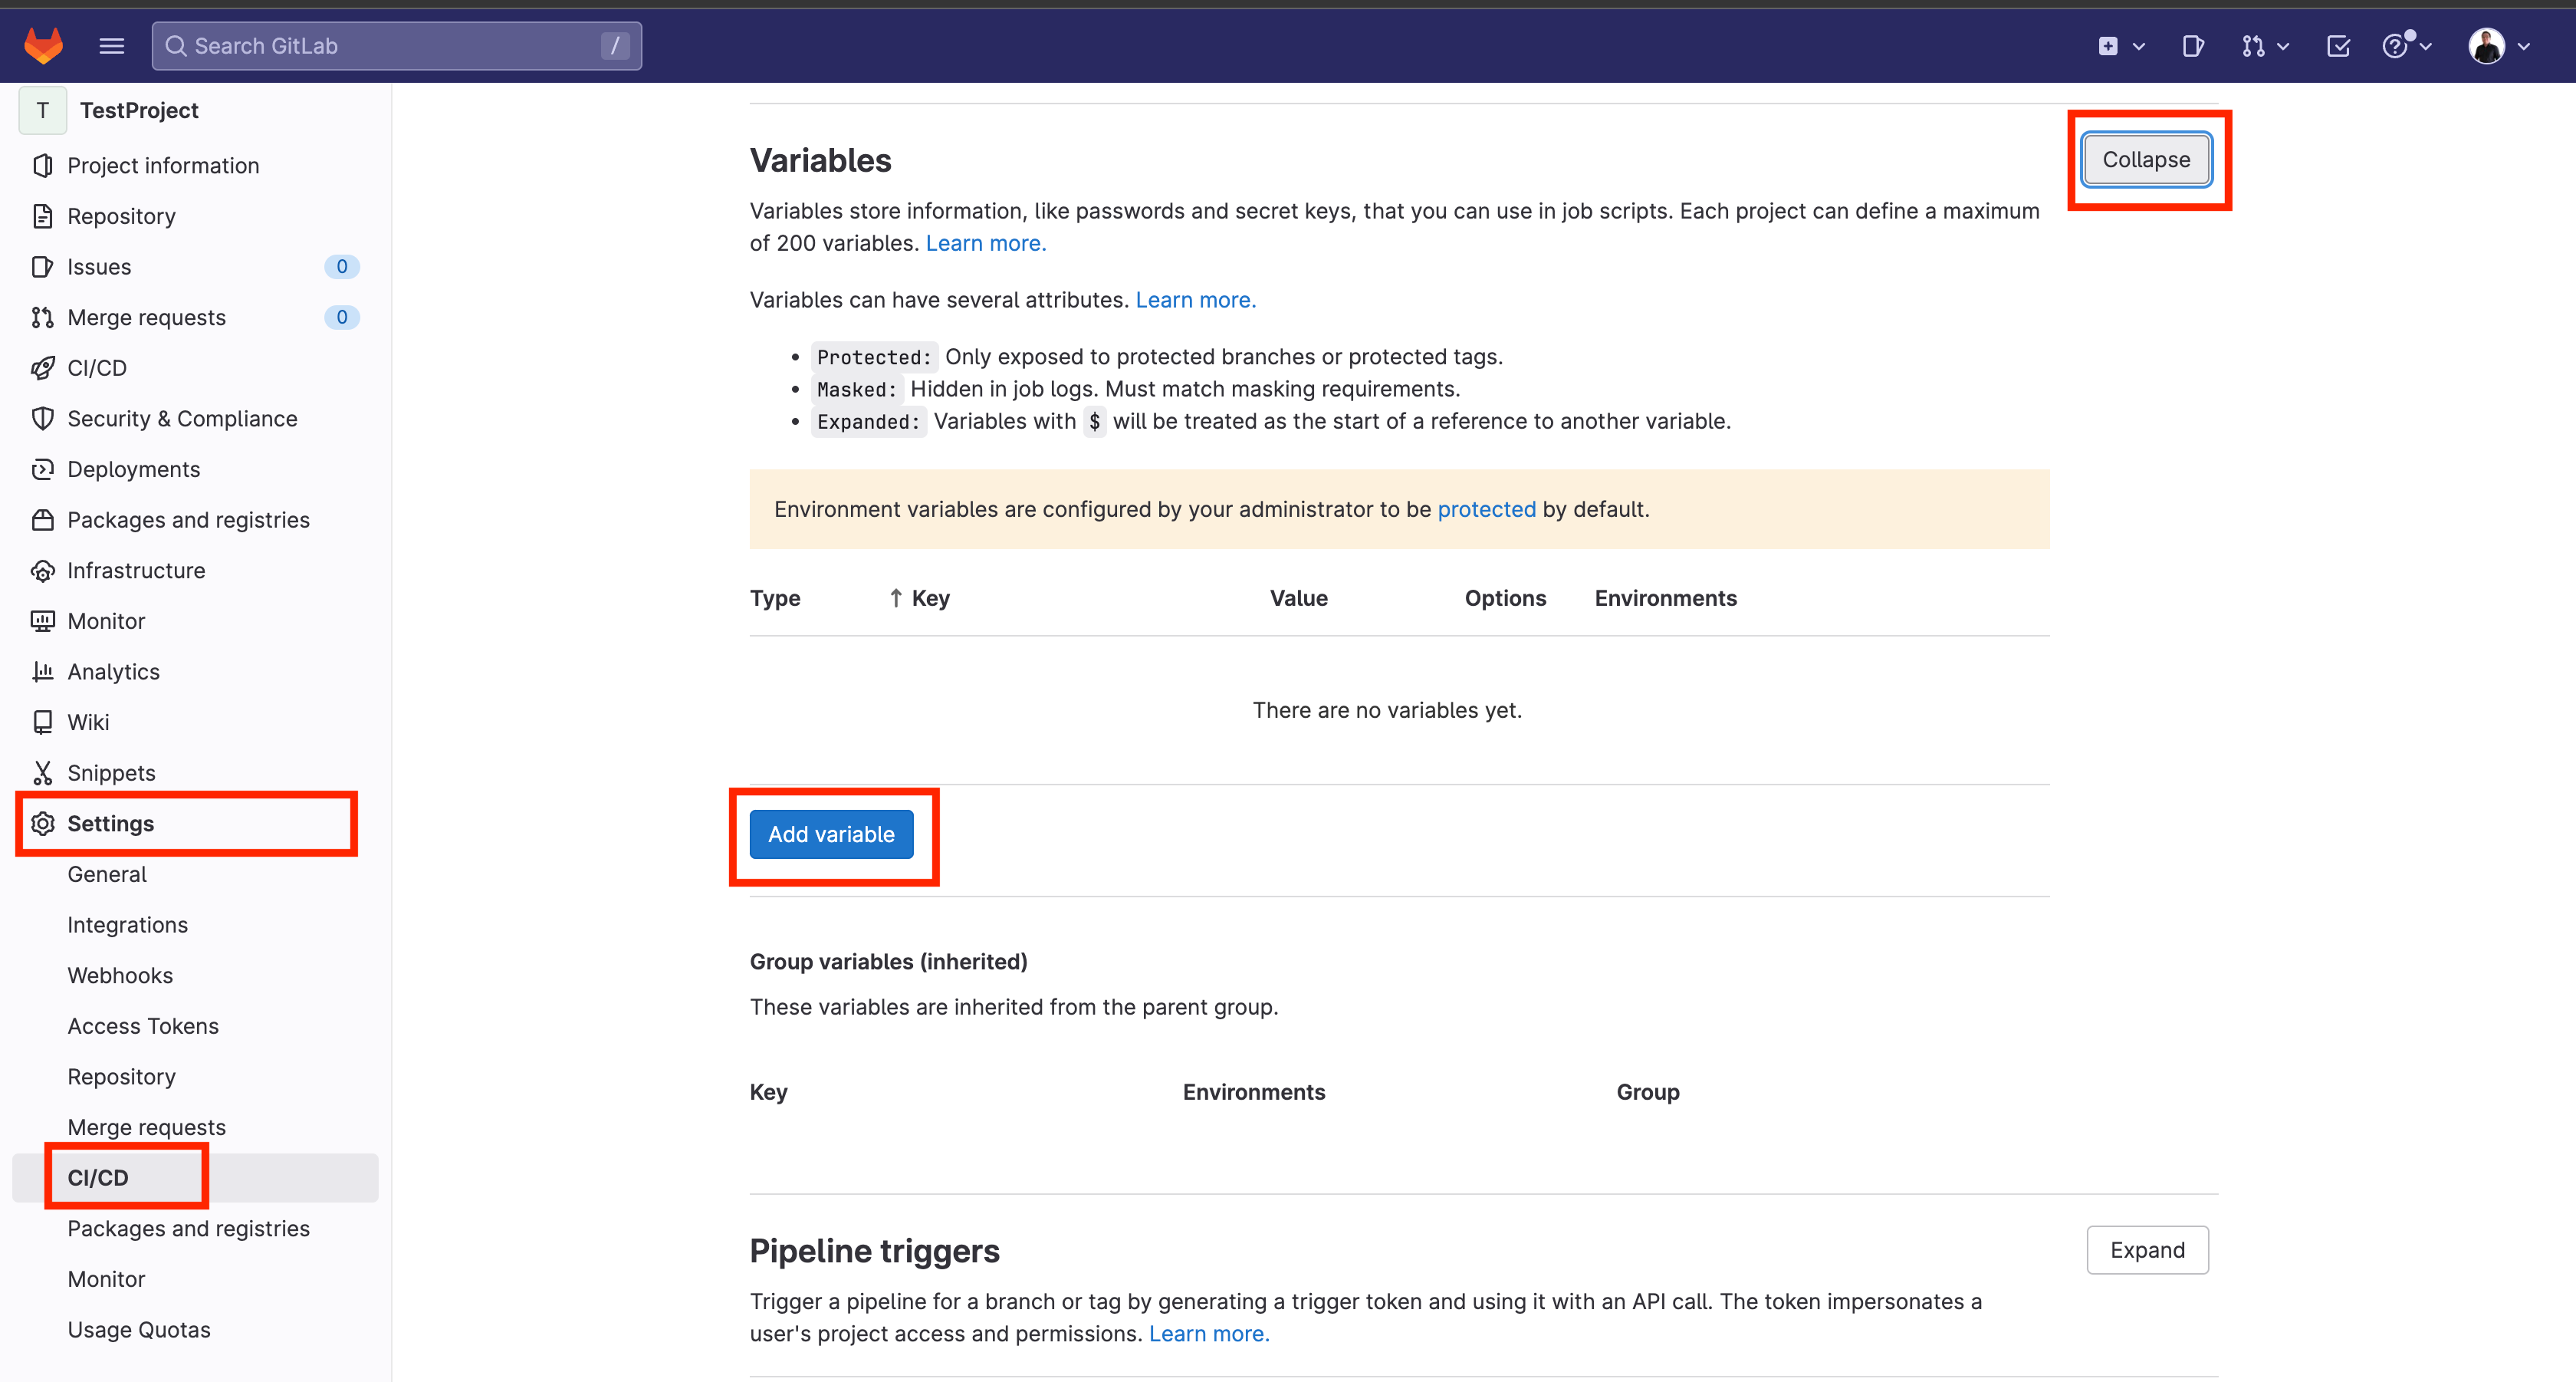
There are variables, so you must declare them in Settings ? CI/CD ? Variables ? Expand.
(AJ Canlas, CC BY-SA 4.0)
Add all the variables required:
BE_ACCESS_TOKEN => GitLab Access Token BE_REMOTE_STATE_ADDRESS => This was the rendered TF_ADDRESS variable BE_USERNAME => GitLab username OS_USERNAME => OpenStack Username OS_TENANT => OpenStack tenant OS_PASSWORD => OpenStack User Password OS_AUTH_URL => Auth URL OS_REGION => OpenStack Region
So for this example, I used the following:
BE_ACCESS_TOKEN = "wwwwwwwwwwwwwwwwwwwww" BE_REMOTE_STATE_ADDRESS = https://gitlab.com/api/v4/projects/42580143/terraform/state/homelab BE_USERNAME = "ajohnsc" OS_USERNAME = "admin" OS_TENANT = "admin" OS_PASSWORD = "YYYYYYYYYYYYYYYYYYYYYY" OS_AUTH_URL = "http://X.X.X.X:35357/v3" OS_REGION = "RegionOne"
And it is masked GitLab for its protection.
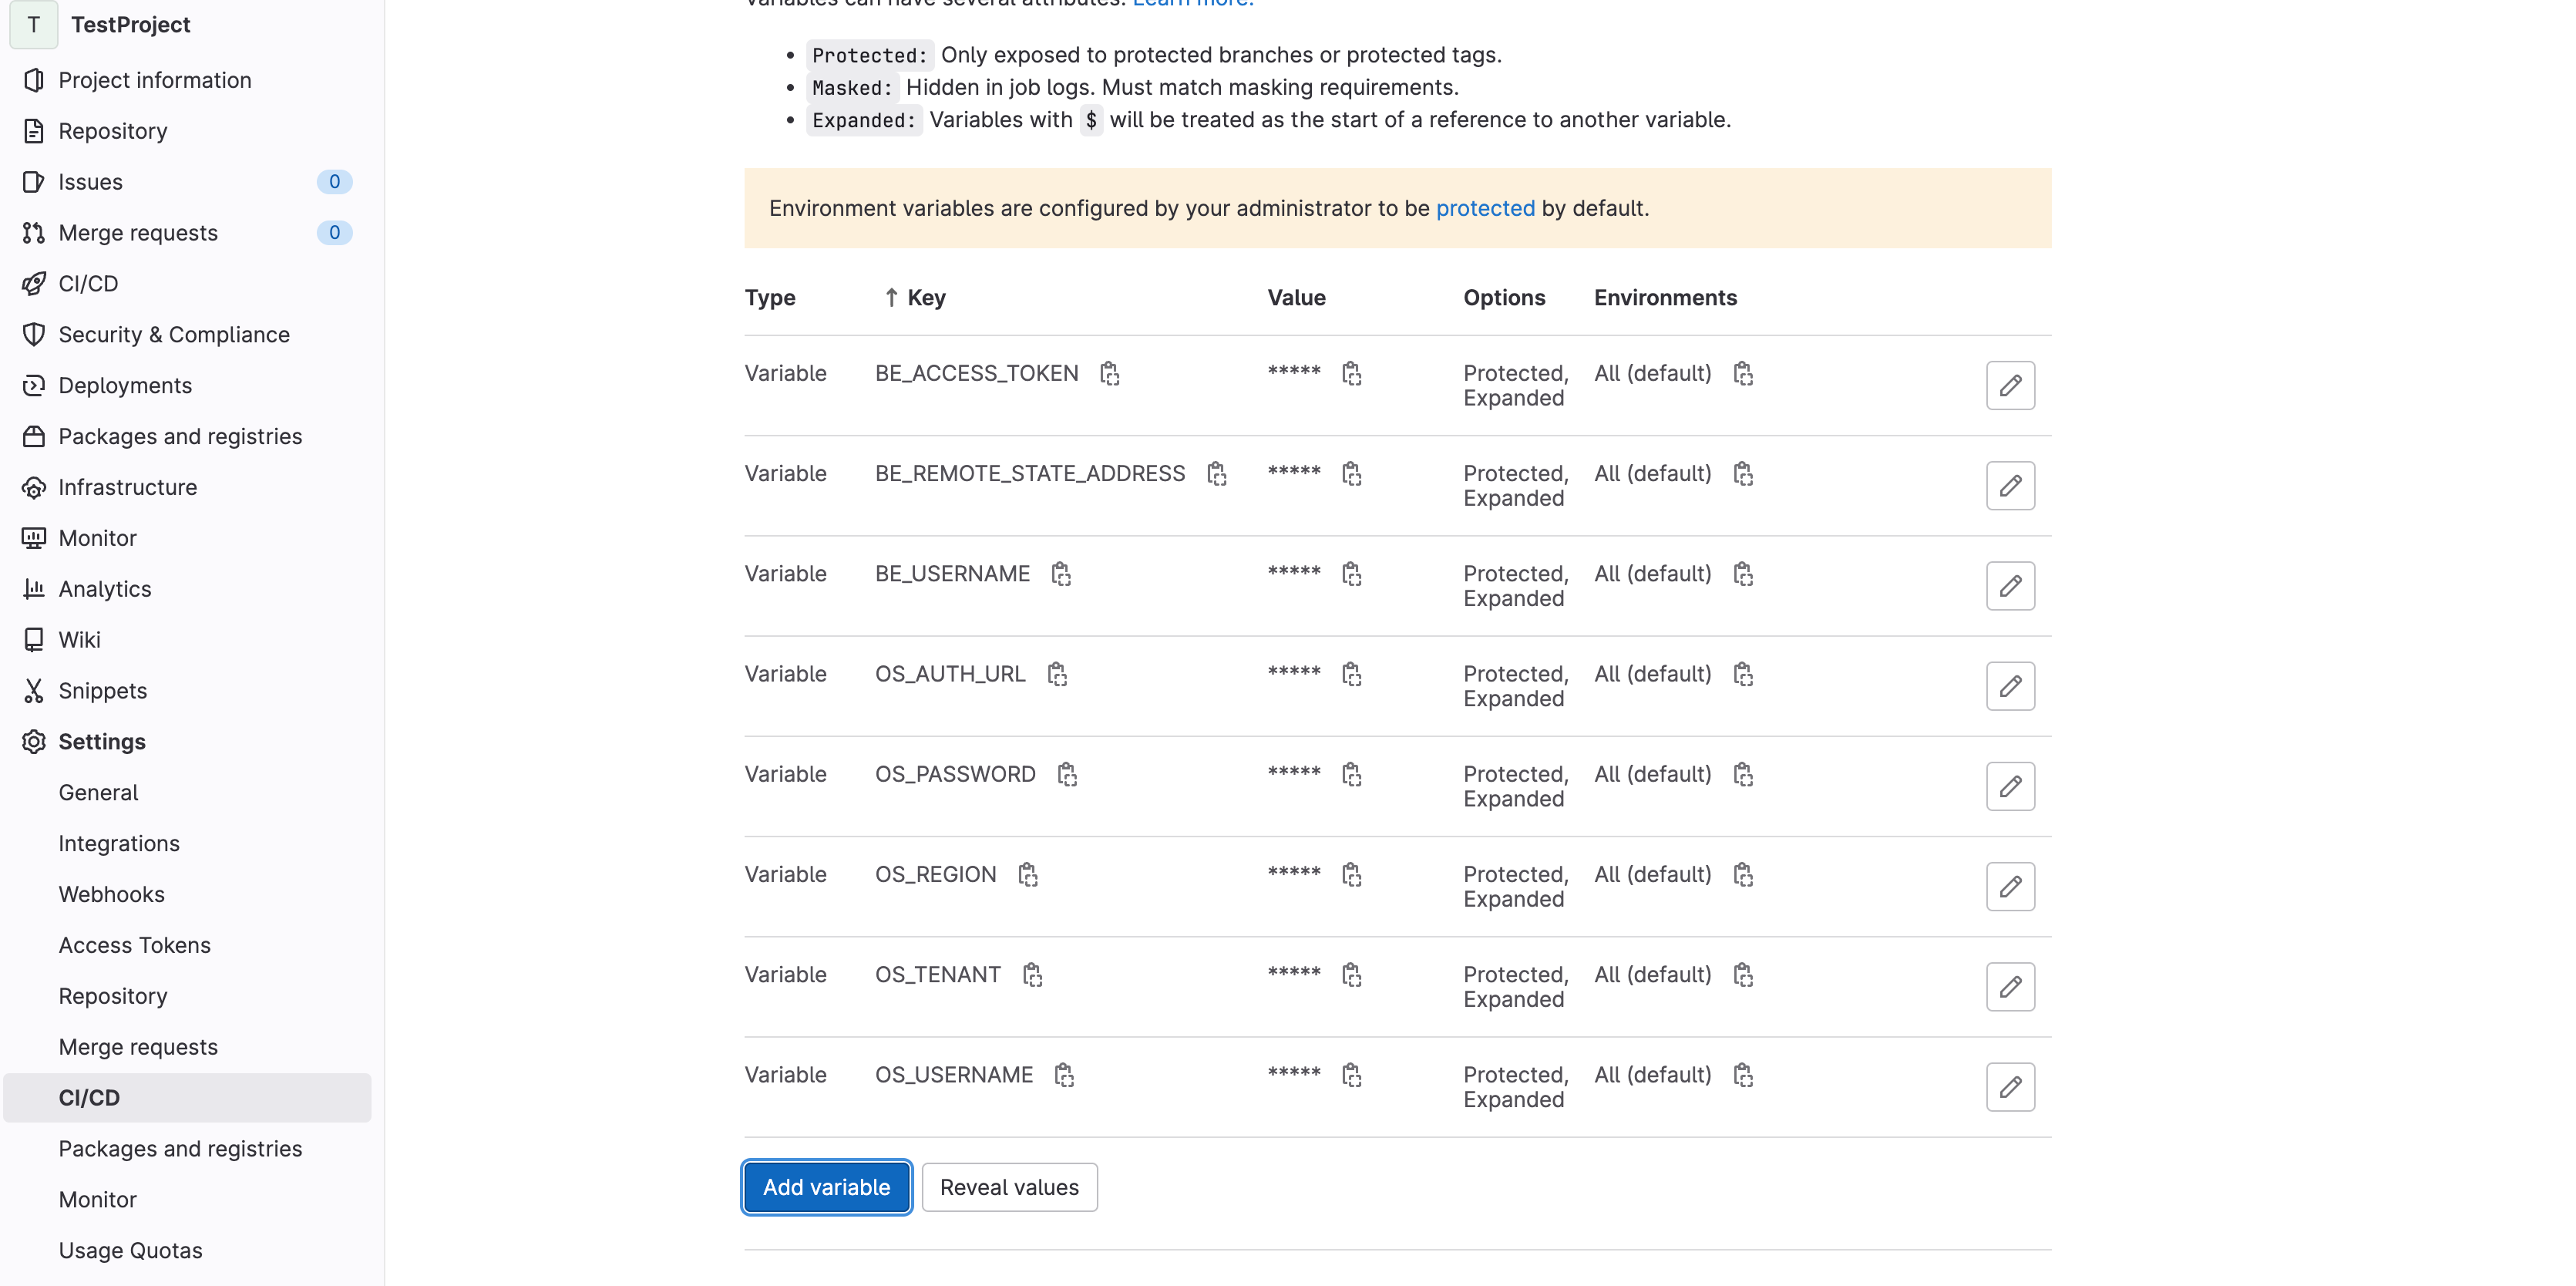
(AJ Canlas, CC BY-SA 4.0)
The last step is to push the new files to the repository:
$ git add . $ git commit -m "First commit" [main (root-commit) e78f701] First commit 10 files changed, 194 insertions(+) create mode 100644 .gitignore create mode 100644 .gitlab-ci.yml create mode 100644 backend.tf create mode 100644 demo-project-user.tf create mode 100644 external-network.tf create mode 100644 flavors.tf create mode 100644 images.tf create mode 100644 provider.tf create mode 100644 routers.tf create mode 100644 variables.tf $ git push Enumerating objects: 12, done. Counting objects: 100% (12/12), done. Delta compression using up to 4 threads Compressing objects: 100% (10/10), done. Writing objects: 100% (12/12), 2.34 KiB | 479.00 KiB/s, done. Total 12 (delta 0), reused 0 (delta 0), pack-reused 0 To gitlab.com:testgroup2170/testproject.git * [new branch] main -> main
View the results
View your new pipelines in the CI/CD section of GitLab.
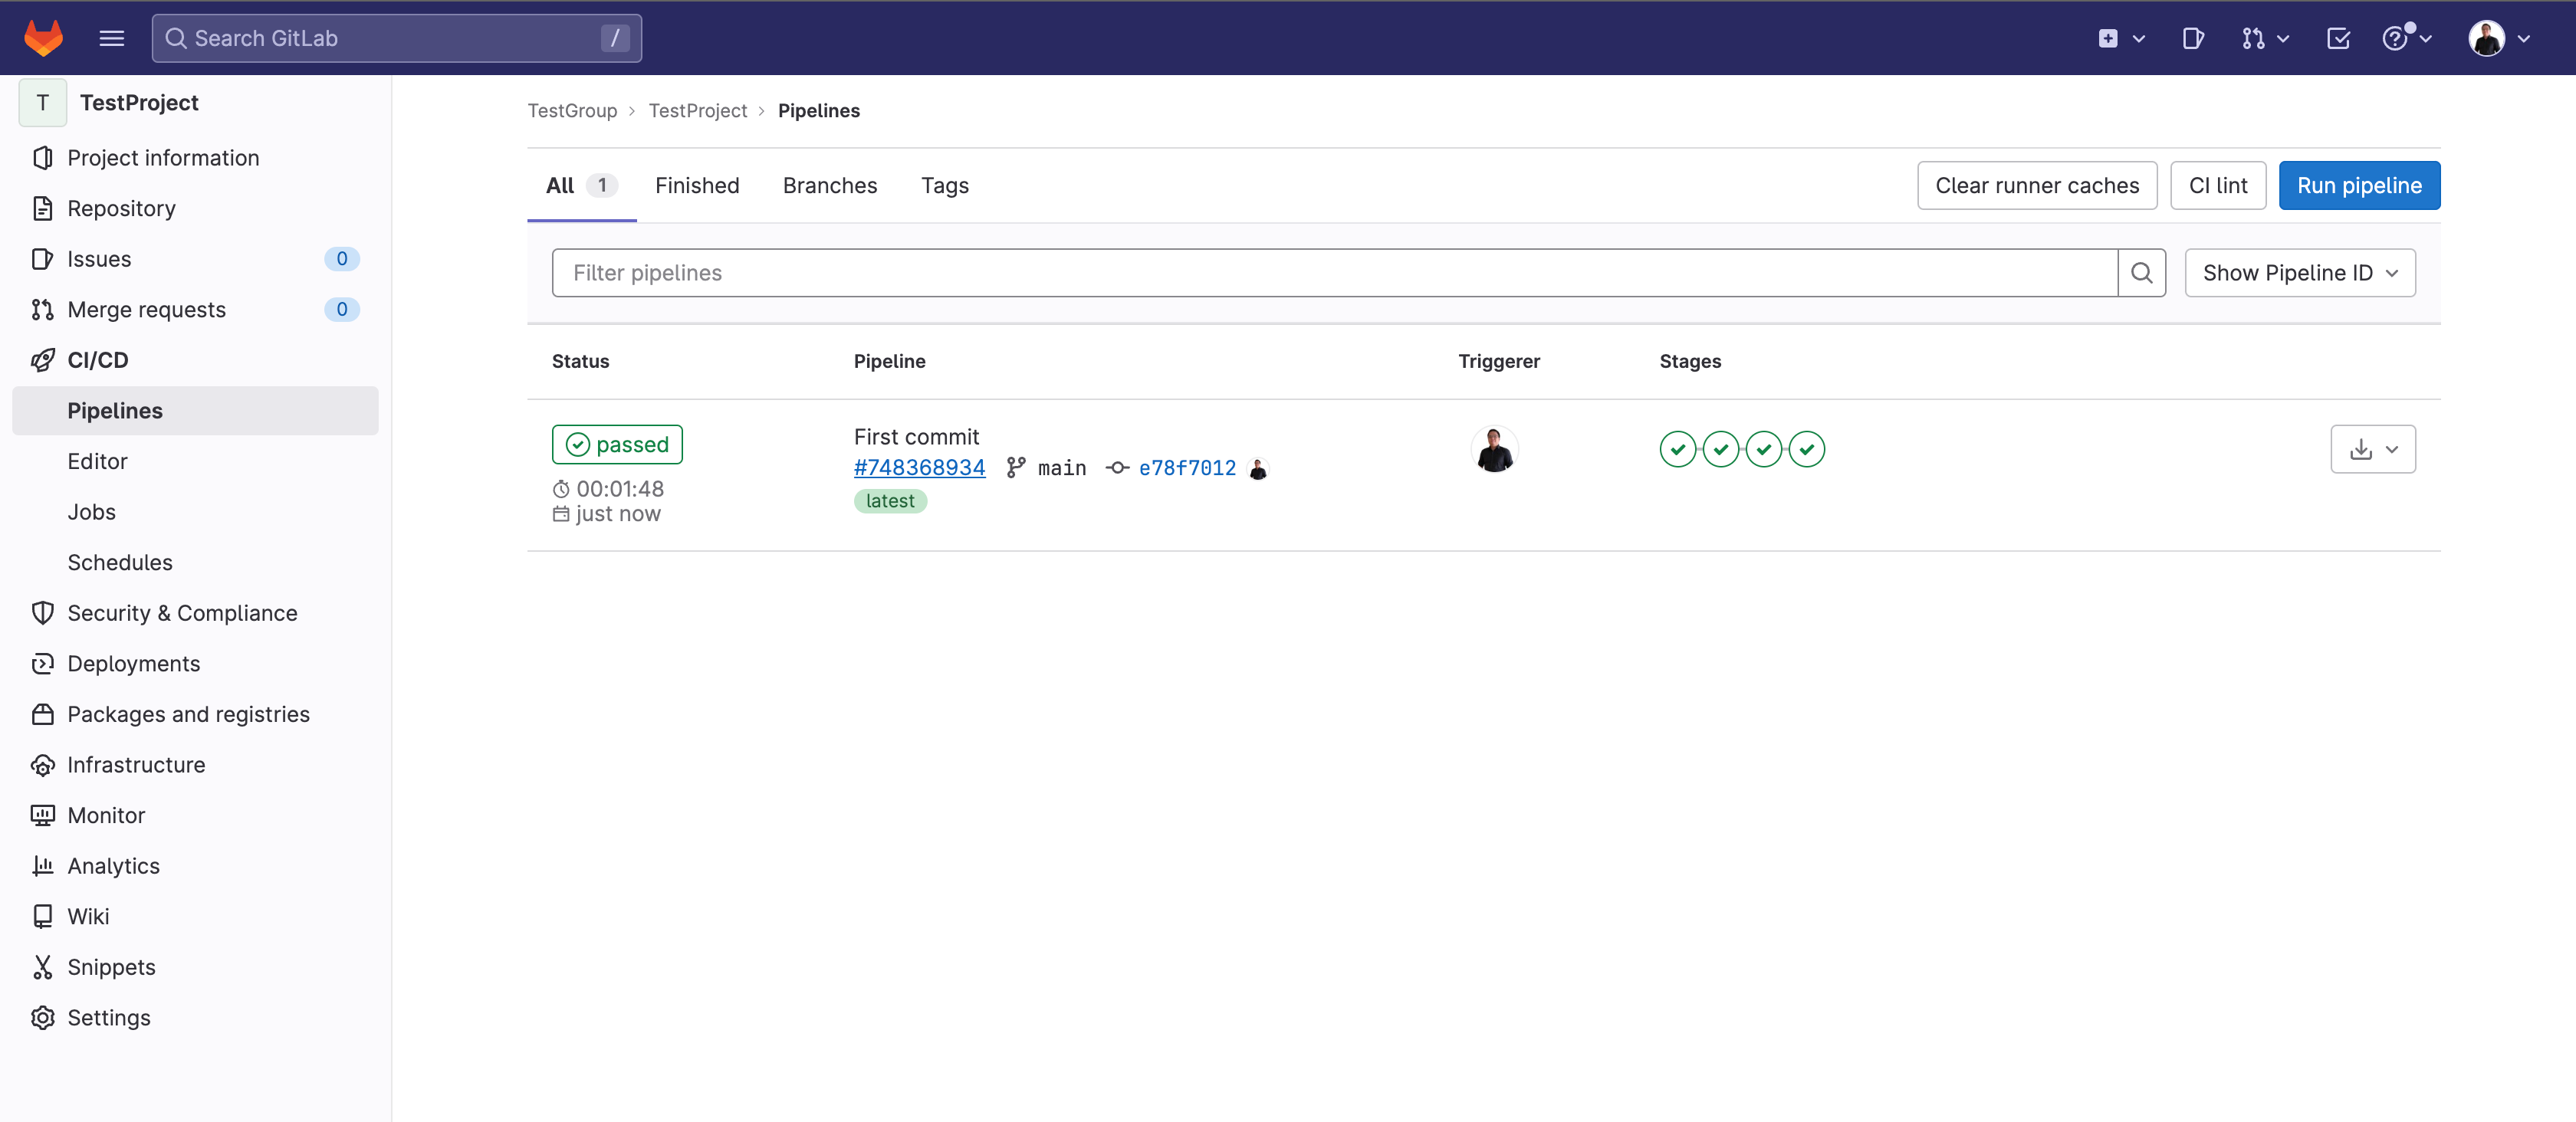
(AJ Canlas, CC BY-SA 4.0)
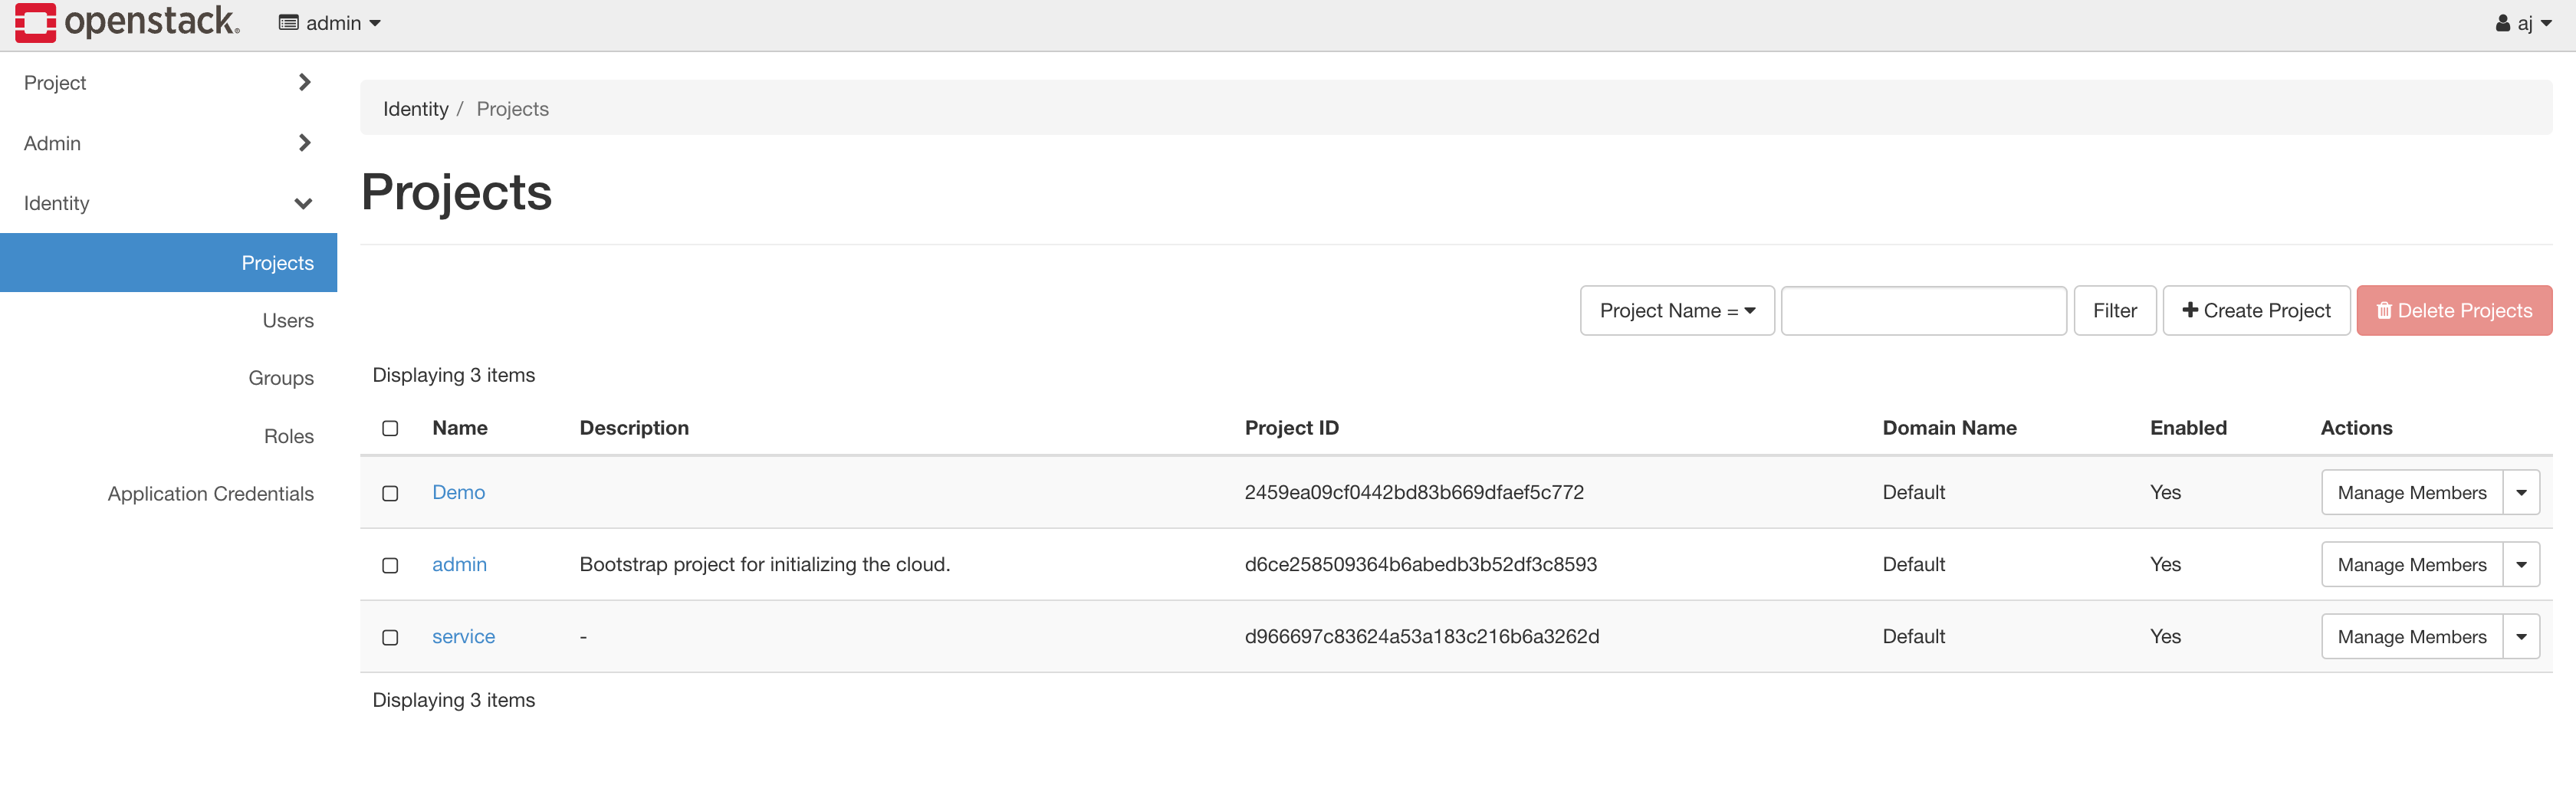
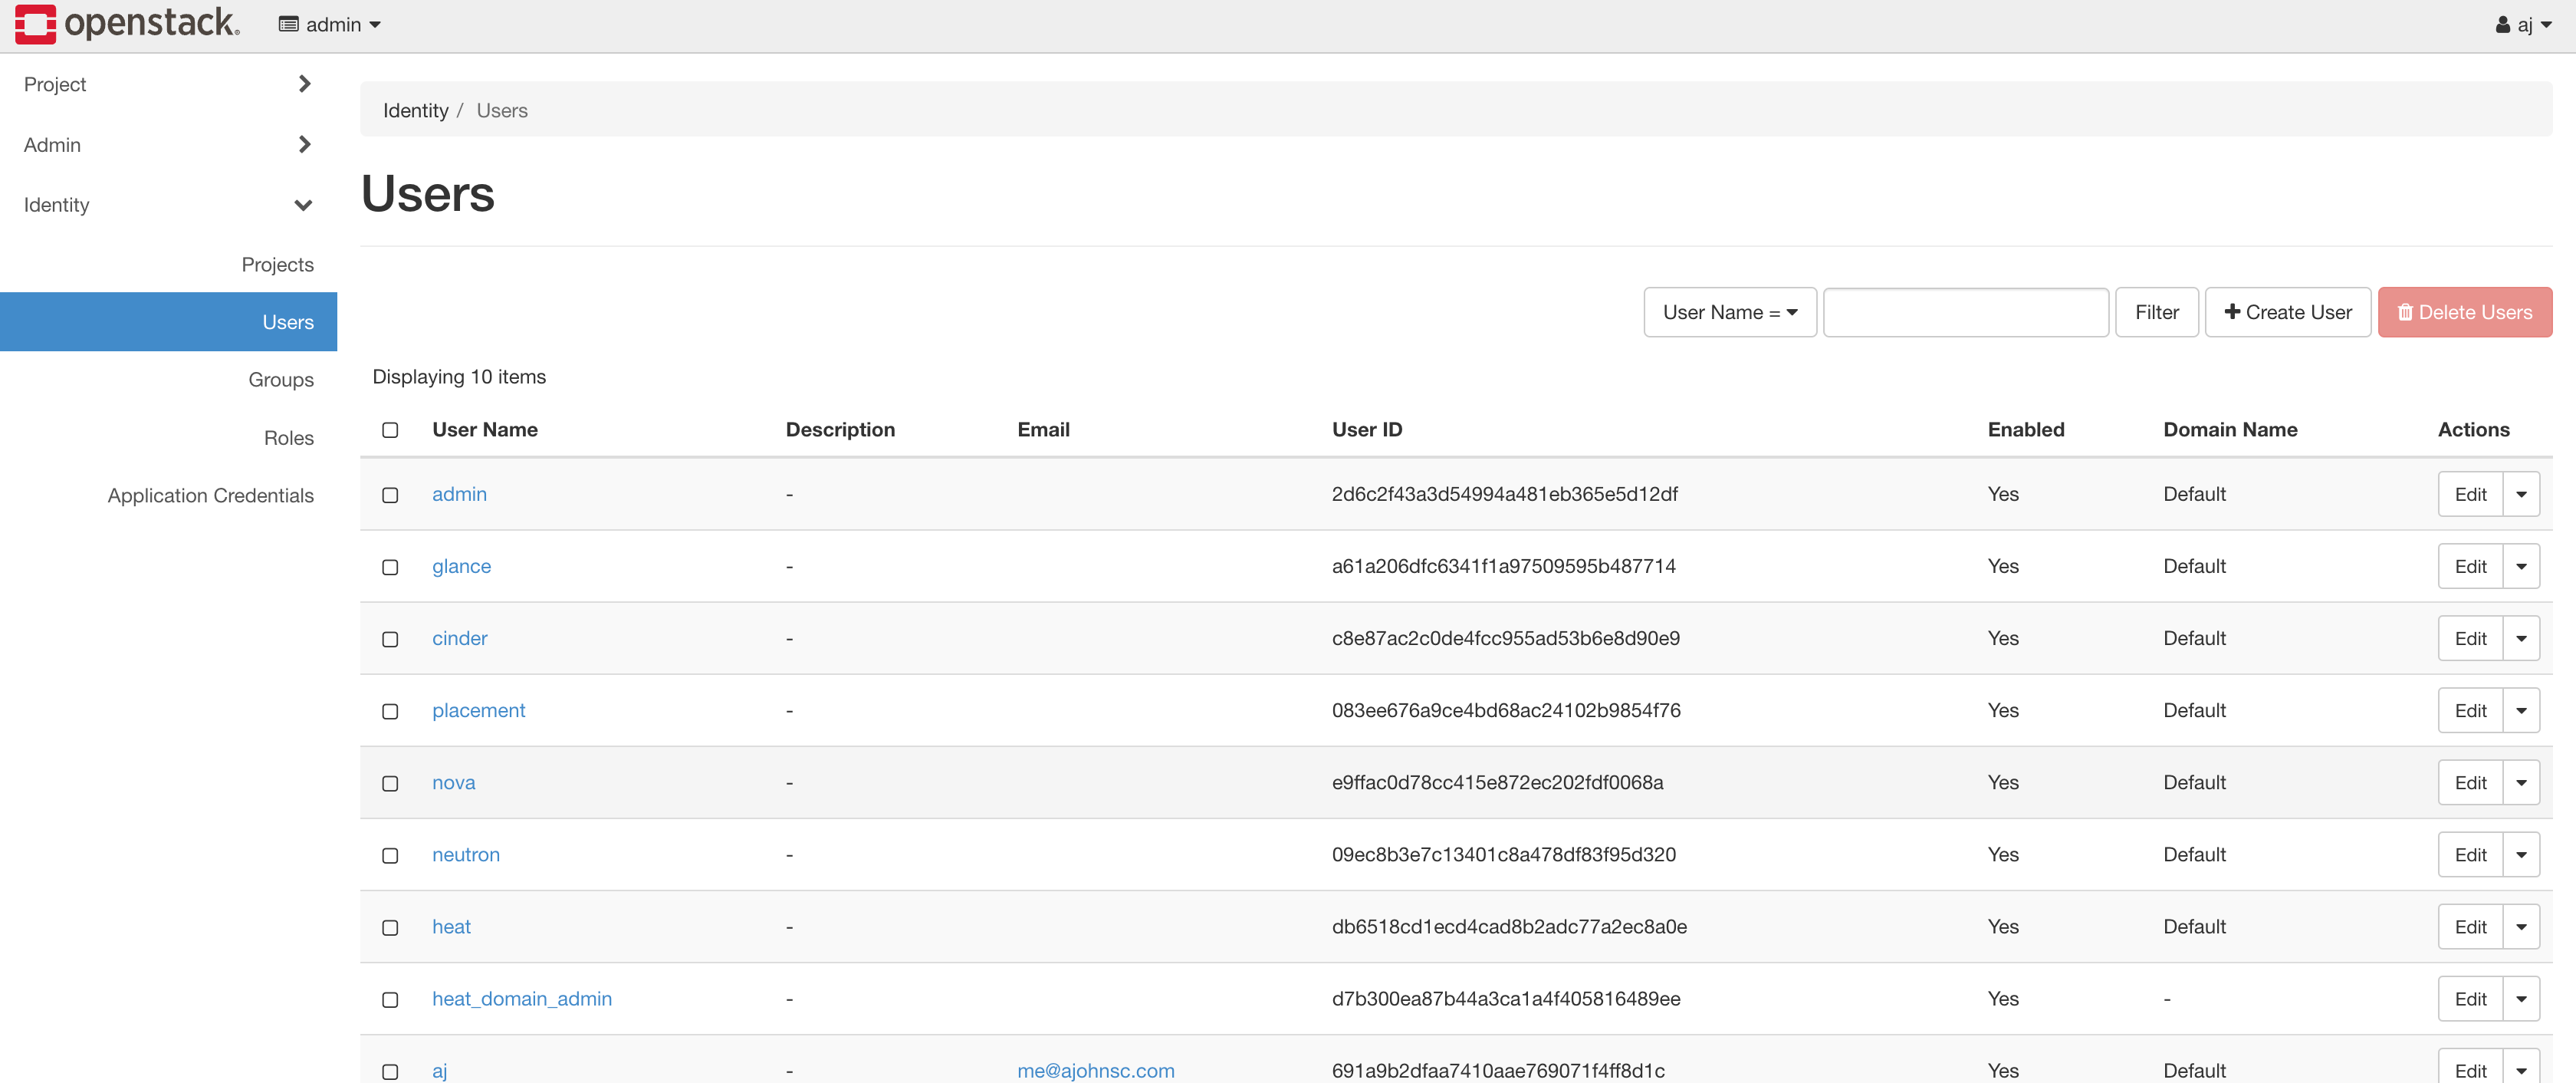
On the OpenStack side, you can see the resources created by Terraform.
The networks:

(AJ Canlas, CC BY-SA 4.0)
The flavors:
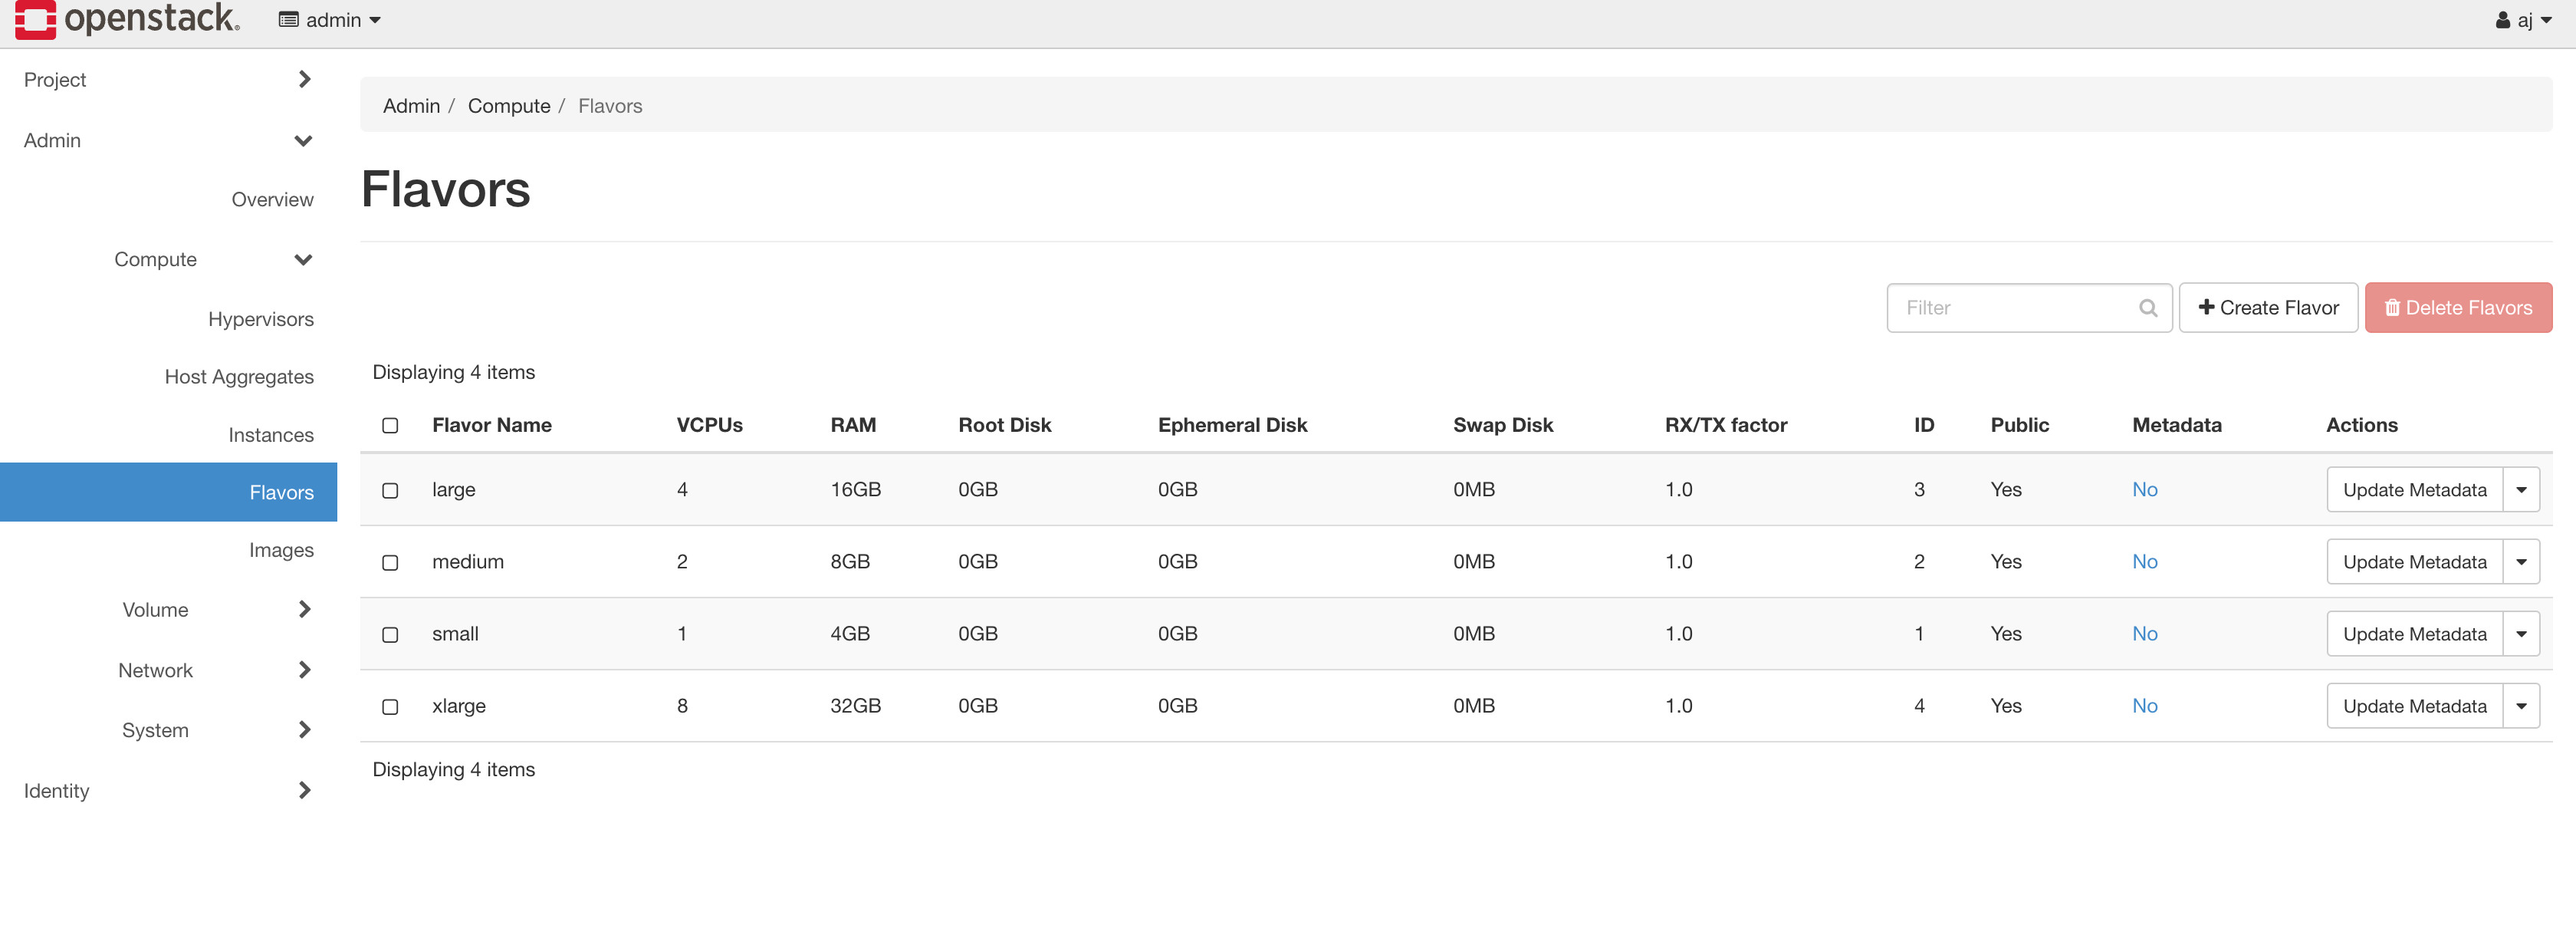
(AJ Canlas, CC BY-SA 4.0)
The images:
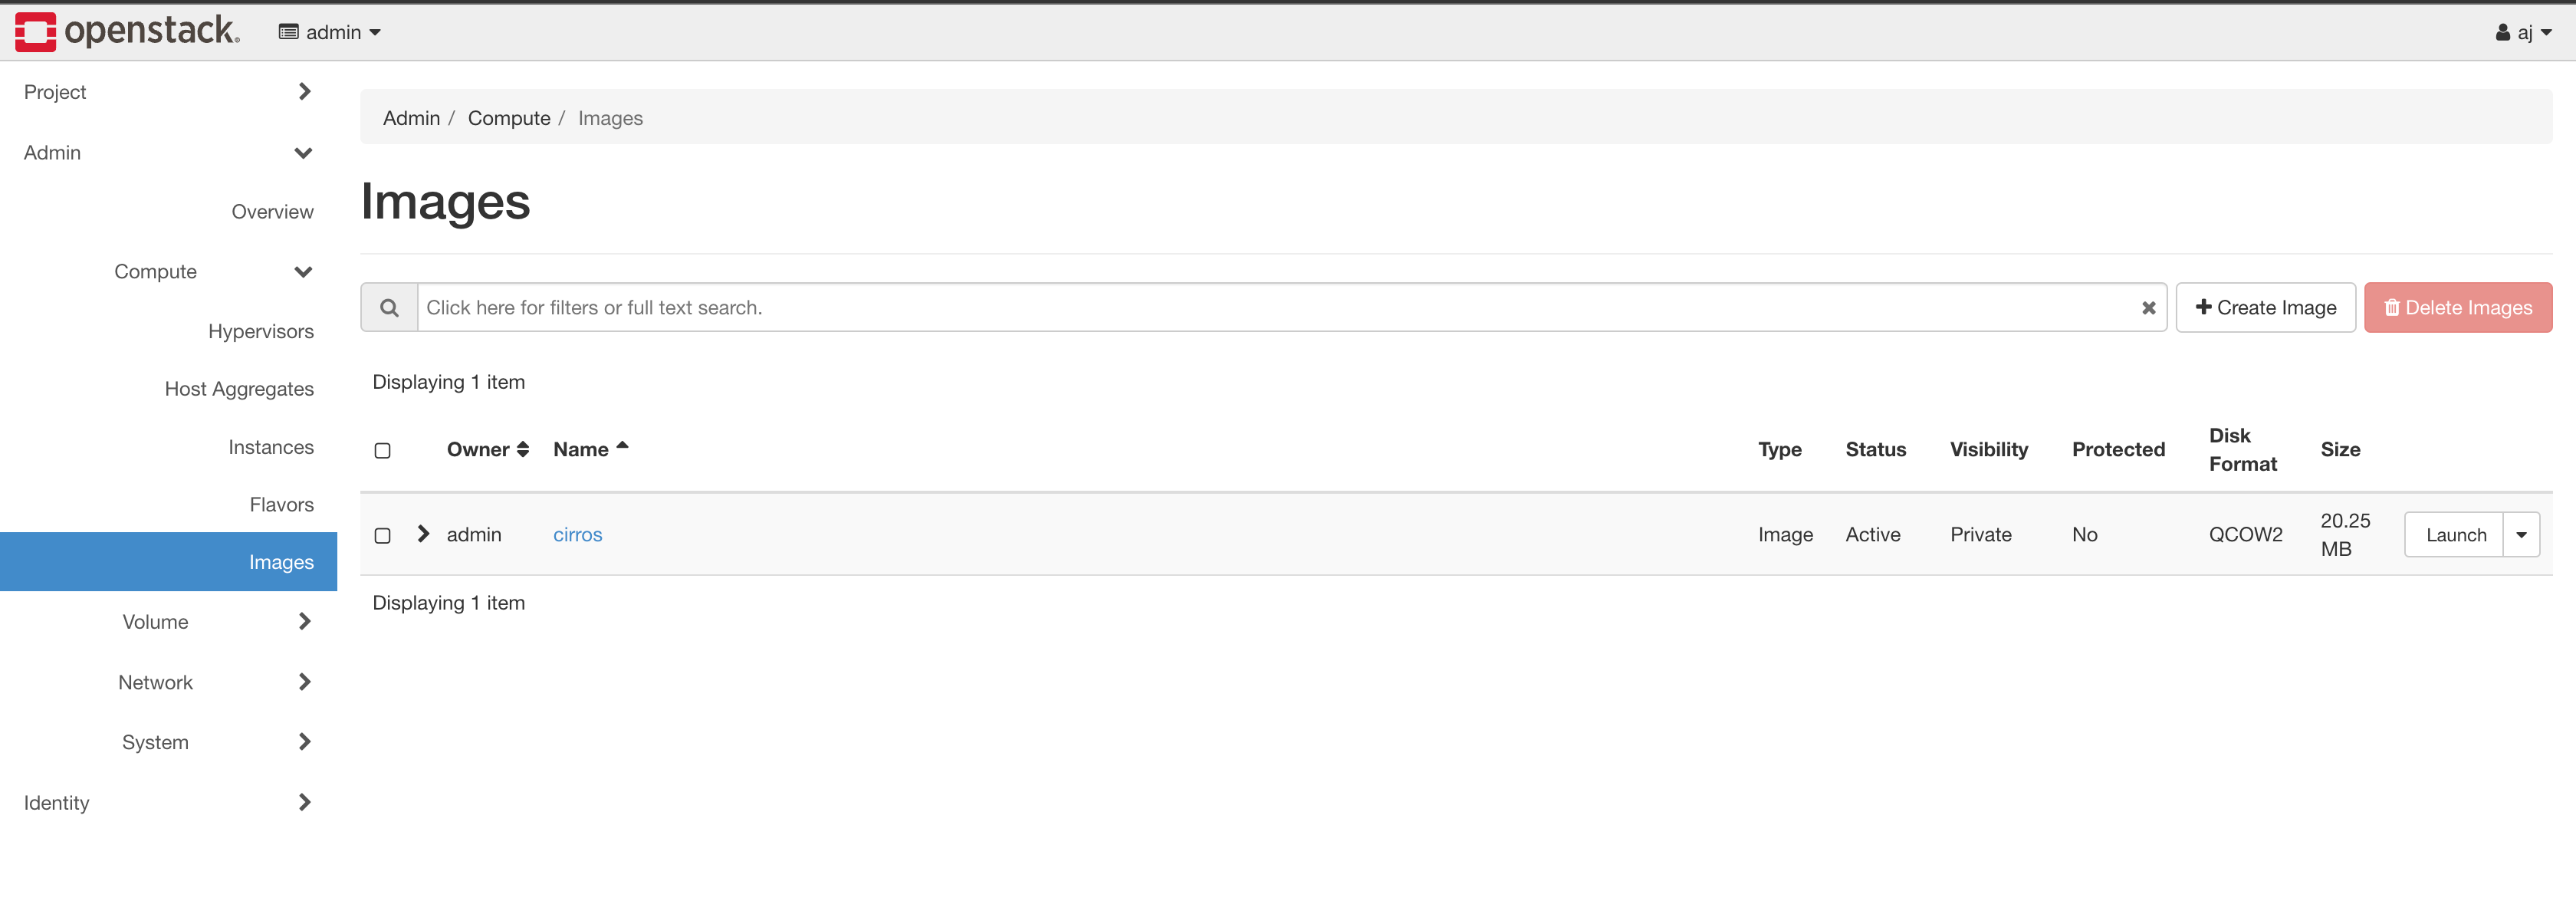
(AJ Canlas, CC BY-SA 4.0)
The project:
(AJ Canlas, CC BY-SA 4.0)
The user:
(AJ Canlas, CC BY-SA 4.0)
Next steps
Terraform has so much potential. Terraform and Ansible are great together. In my next article, I'll demonstrate how Ansible can work with OpenStack
Follow this tutorial to see how using GitLab can further enhance collaboration in your OpenStack cluster.

Opensource.com
 This work is licensed under a Creative Commons Attribution-Share Alike 4.0 International License.
: Opensource.com ajscanlas
Supporting Open Source.
Have you tried: Travelling to South Africa?